GIGA VU PRO EVOLUTION - Portable media player JOBO - Free user manual and instructions
Find the device manual for free GIGA VU PRO EVOLUTION JOBO in PDF.
User questions about GIGA VU PRO EVOLUTION JOBO
0 question about this device. Answer the ones you know or ask your own.
Ask a new question about this device
Download the instructions for your Portable media player in PDF format for free! Find your manual GIGA VU PRO EVOLUTION - JOBO and take your electronic device back in hand. On this page are published all the documents necessary for the use of your device. GIGA VU PRO EVOLUTION by JOBO.
USER MANUAL GIGA VU PRO EVOLUTION JOBO
GIGA Vu Pro evolution

User Manual
Contents
1 Safety Instructions 4
2 Overview 5
2.1 Scope of Delivery 5
2.2 Features in Brief 5
2.3 First Use 5
2.4 Getting Familiar with the GVPE 6
2.4.1 Operating Elements 6
2.4.2 Screen 7
2.4.3 Power supply / Charging the Battery 7
2.4.4 Rubber Protection Cover 7
2.4.5 Devices for Data Transfer 7
3 Quick Instruction for Photo Download from a CF Card 9
4 General Instructions 10
4.1 General Instructions 10
4.2 Buttons "Home", "Back" and Settings 10
4.3 How to Select Content 12
4.4 How to Use the Keyboard 13
4.5 Use external keyboard 14
5 Basic Settings 15
5.1 Device Info 15
5.2 Device Settings 15
5.3 Screen & Video Settings 16
5.4 WiFi & FTP Settings 17
5.5 Owner Info 18
5.6 Reset Functions 19
6 Data Import, Data Export and Disk Management 19
6.1 Copy Data from or to a Memory Card 19
6.1.1 Import data from a Memory Card 19
6.1.2 Export Data to a Memory Card 22
6.2 Copy Data from or to a Computer 23
6.2.1 Connect the Device to a Computer 23
6.2.2 Import Data from a Computer 23
6.2.3 Export Data to a Computer 24
6.3 Backup Data 25
6.4 Disk Management 25
7 Managing Photos 27
7.1 Some Remarks about File Formats 27
7.2 Previews 27
7.2.1 Generate Previews 27
7.2.2 Delete Previews 28
7.3 Select a Photo Album 28
7.4 View Pictures 29
7.4.1 View Picture Details 30
7.4.2 Show Info Data (EXIF) 32
7.4.3 Show Color Channels 33
7.4.4 Show Histogram 34
7.4.5 Rotate Pictures 34
7.4.6 Delete Single Pictures and Albums 35
7.5 Thumbnail View 35
7.6 FileListView 36
7.7 View Slide Shows 36
7.8 Print Photos 37
7.9 Rename Photos 38
7.9.1 Rename Albums 38
7.9.2 Rename Pictures 38
7.10.1 Copy Pictures to another Album 39
7.10.2 Add Comments 39
7.10.3 Manage Keywords 40
7.10.4 Add Keywords to Pictures 41
7.11 View Pictures with Photo Voice Annotations 41
8 Dust Detection 42
9 Playing Music 42
9.1 Playing Music 42
9.2 Copy Sound Files 43
9.3 Delete an Album or a Single Music File43
9.4 Rename an Album 44
10 Watching Movies 45
10.1 Watching Movies 45
10.2 Copy Movie Clips 46
10.3 Delete an Album or a Single Movie Clip 46
10.4 Rename an Album 47
11 Software Upgrade 47
12 Available Accessories 48
13 Technical Specification 49
Addendum1 51
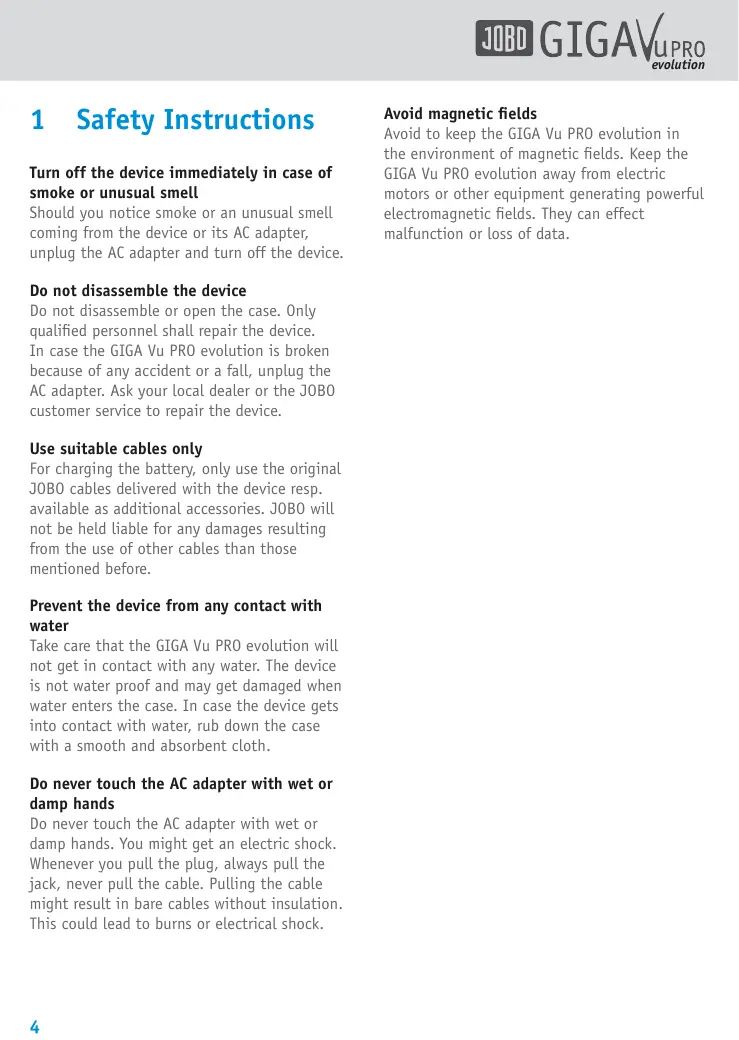
1 Safety Instructions
Turn off the device immediately in case of smoke or unusual smell
Should you notice smoke or an unusual smell coming from the device or its AC adapter, unplug the AC adapter and turn off the device.
Do not disassemble the device
Do not disassemble or open the case. Only qualified personnel shall repair the device. In case the GIGA Vu PRO evolution is broken because of any accident or a fall, unplug the AC adapter. Ask your local dealer or the JOBO customer service to repair the device.
Use suitable cables only
For charging the battery, only use the original JOBO cables delivered with the device resp. available as additional accessories. JOBO will not be held liable for any damages resulting from the use of other cables than those mentioned before.
Prevent the device from any contact with water
Take care that the GIGA Vu PRO evolution will not get in contact with any water. The device is not water proof and may get damaged when water enters the case. In case the device gets into contact with water, rub down the case with a smooth and absorbent cloth.
Do never touch the AC adapter with wet or damp hands
Do never touch the AC adapter with wet or damp hands. You might get an electric shock. Whenever you pull the plug, always pull the jack, never pull the cable. Pulling the cable might result in bare cables without insulation. This could lead to burns or electrical shock.
Avoid magnetic fields
Avoid to keep the GIGA Vu PRO evolution in the environment of magnetic fields. Keep the GIGA Vu PRO evolution away from electric motors or other equipment generating powerful electromagnetic fields. They can effect malfunction or loss of data.
2 Overview
On the next pages we will explain all functions of the Giga Vu Pro Evolution. In the following description the device will be abbreviated as GVPE.
2.1 Scope of Delivery
The GVPE is delivered with the following equipment:
GVPE, covered with a rubber protection cover
- AC power supply
USB cable (USB 2)
- Operating manual
- Analogue audio-video cable
- Earphones
Remote control
There are several accessories available:
External PowerPack
- Power supply for 12 V socket (e.g. in a car's cigarette lighter)
WiFi interface card
Multi Card Adapter
See chapter 12, "Available Accessories" for more information.
2.2 Features in Brief
The GVPE can be used for the following actions:
1 Transferring data from and to various data carriers
2 Intermediate storage of photos
3 View and select photos
4 Print photos
5 Prepare slide shows
6 Present slide shows
7 Dust detection on the camera chip
8 Intermediate storage of MP3 music files
9 Playing music
10 Intermediate storage of MPEG2 and MPEG4 video files
11 Watching movies
The data can be transferred via numerous types of memory cards, USB connections or WiFi to a camera, a printer or a computer.
2.3 First Use
Opening the device
The GVPE is equipped with a rubber cover. It protects the screen and covers all interface ports to prevent dust from entering into the device. For using the GVPE take off the rubber cover, turn it around and attach it to the bottom of the unit.
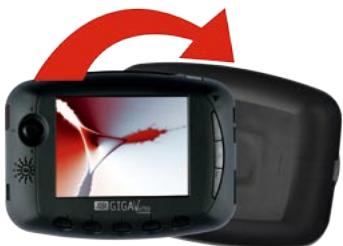
Fig. 2.2: Opening the device.
First charge

Please read this instruction carefully before the first use of GVPE!
The GVPE will be delivered with a completely discharged battery.

Please charge the battery for 9 hours before first use of GVPE.
Then use the battery until it is completely discharged. Only then will the battery report correct levels to the software. The correct battery level in percent will only be displayed reliably after the battery has gone through three full charge and discharge cycles. This is a limitation that exists with all lithium ion batteries.
2.4 Getting Familiar with the GVPE
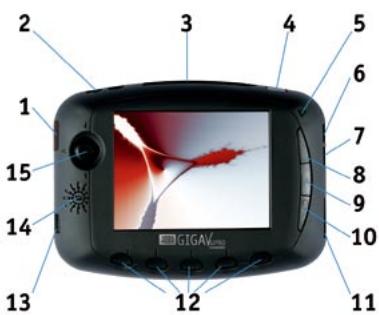
Fig. 2.3: Function elements
1 Infra-red receiver
2 Analogue audio/video out
3 Slot for CompactFlash memory card
4 On/off switch
5 Microphone
6 USB2 high speed interface for data transfer to a computer
7 USB2 OTG interface for data transfer to a printer, camera or external hard disk
8 "Home" button (always returns to the main menu)
9 "Back" button (always takes you one step back)
10 "Settings" button with LED
11 Digital video out
12 5 softkeys with different functions depending on the actual menu
13 Power supply socket
14 Loudspeaker
15 Combined "Enter" button and 4-way joystick to navigate in the screen menus
2.4.1 Operating Elements
Joystick
The 4-way joystick is used for navigating and selecting.
Navigating:
The joystick can be used to scroll trough a list of possible options. For this purpose the joystick has to be moved up or down, resp. to the left or right. The possible options will highlight as you scroll.
Selecting:
Pressing the joystick will confirm a selection, it acts as an "Enter" button.
Softkeys
Below the screen there are 5 buttons, the so called softkeys. Depending on the actual menu on the screen they have different functions. The corresponding function is always displayed on the screen.
2.4.2 Screen
The GVPE is equipped with a high quality, high resolution LCD screen with 640 * 480 RGB pixels. By using state-of-the-art technology, the GVPE screen is very bright and allows easy viewing even outdoors. Brightness and saturation of the LCD screen can be modified. For instruction see chapter 5.3, "Screen & Video Settings".
2.4.3 Power supply / Charging the Battery
The GVPE features a high quality lithium-ion polymer rechargeable battery. The battery pack includes an integrated circuit (gas gauge) which continuously monitors capacity and other critical battery parameters. The battery will provide you with accurate remaining run-time predictions, even if the battery ages over time. To charge just connect the AC power supply to the GVPE. While the unit is charging the LED in the "Settings" button will turn red. When charging is complete the LED will dim.
2.4.4 Rubber Protection Cover
The rubber cover protects the GVPE's screen. When closed, it covers all interface ports to prevent dust from entering the device. Take off the rubber cover with light pressure, turn it around and attach it to the bottom of the unit to use the GVPE.
2.4.5 Devices for Data Transfer
The GVPE can transfer data from and to several devices. It is important to chose the correct cable and socket for each type of data transfer. Figure 2.4 shows the various options and the corresponding cables.
Fig. 2.4: Cables for data transfer to different devices
USB connectors
The GVPE features two USB connectors. The upper USB connector is a high speed USB 2 mass storage interface. Use this one for fast communication between the GVPE and a computer. Copying is done from PC to GVPE's hard disk directly without involvement of the GVPE's main microprocessor. Transfer speed can reach 20 MBytes/s in this way, provided the PC's interface is as fast.
For best operation, connect the GVPE directly to your computer and do not route it through a hub. Using a hub may sometimes lead to operational conflict and data loss.
The lower USB connector is a USB 2 OTG (On The Go) interface. This interface is handled by the main processor. This port is used for
- connecting the GVPE directly to a camera. In this way you can download pictures from the camera to the GVPE without having to remove the memory card from the camera. The camera's USB interface must be set to "Mass Storage Device" and NOT to "PTP" (Picture Transfer Protocol).
- connecting GVPE to external USB hard disk. Use this to backup all files stored in your GVPE. In this case the GVPE is the "Master" and the external USB hard disk is a "mass storage device". If you want to make a backup from one GVPE to a second unit you must connect the cable between the first GVPE lower USB port (Master) to the second GVPE upper USB port (mass storage device).
- connecting GVPE to compatible PictBridge printers.
Socket "Analogue audio/video out"
This socket can be either used to connect the GVPE to a TV set or to use the earphones.
Use the supplied audio/video cable to connect the GVPE to a TV set. This is convenient for watching slide shows and movies. See chapter 5.3, "Screen & Video Settings" for selecting either the NTSC (mainly North America) or the PAL (e.g. most European countries) TV standard.
Use the supplied headphones to listen to music via the GVPE.
Socket "Digital video out"
This socket is intended for connecting the GVPE to high quality flat panel TVs and computer monitors and beamers. Use the supplied digital video cable for connecting the display resp. the flat panel TV.
The digital video output has a fixed resolution of 640 × 480 pixels (VGA, 60Hz ), i.e. the connected monitor or flat screen has to support this setting. PC monitors that only provide higher resolutions will not be able to synchronize with the GVPE. In this case the settings of the PC's video card have to be adjusted. Please consult the PC manual for further information.
When presenting slide shows and movies using the digital video output the quality level will be higher than ever seen before in Portable Storage Devices (PSD).
Infra-red interface
The infra-red receiver gets signals from the remote control. This will be used for music playback, video playback and photo slide shows. The remote control has 7 buttons in total with the following functions:
-Play
- Pause
- Stop
- Next
- Previous
- Volume Up
- Volume Down
3 Quick Instruction for Photo Download from a CF Card
When operating the first time with the GVPE without AC power supply, make sure that the battery is charged completely as described in chapter 2.3, "First use".
1 Take off the rubber cover, turn it around and attach it to the bottom of the unit.
2 Plug in the AC power supply.
3 Press the On/Off button for a few seconds.
4 Allow the unit to power-up.
5 Enter a memory card in the memory card slot and wait a few seconds. The screen will appear as shown in Fig. 3.1.
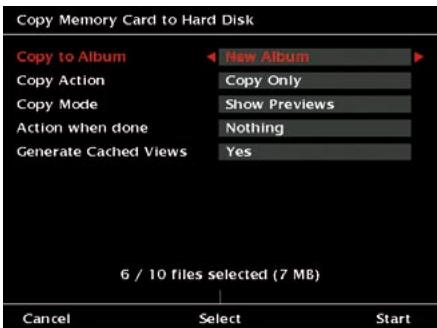
Fig. 3.1: Screen "Copy from CF card".
6 Press softmax 5, "Start" (the rightmost one).
Now the GVPE copies all files from the memory card to its hard disk.
7 When done, you see how many files have been copied and how much disk space they occupy, how much disk space is used in general and how much capacity is still left on the device.

Fig. 3.2: Screen "Copy form CF card completed".
8 To view the photos, press softkey 1, "Photos" (the leftmost one). Select one of the following modes to view the photos:
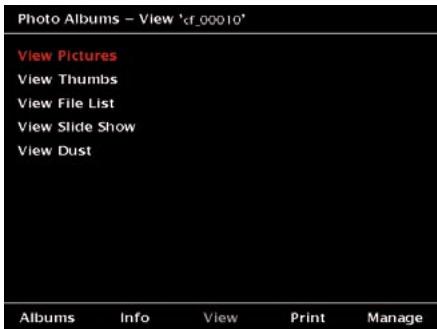
Fig. 3.3: Screen "View mode for photo albums".
Full view
9 To view the photos press the joystick.
10 Use the joystick left / right to browse the pictures.
11 Use the joystick up / down to view or hide the softkey text.
Thumbsail view
9 To view the thumbnails move the joystick up / down until "View Thumbs" is highlighted.
10 Press the joystick.
11 Press softmax 1 resp. 2 to browse the thumbnail-pages.
12 Move the joystick up, down, left or right to select a photo.
13 Press the joystick to view the selected photo in full view.
14 Press the joystick again to return to thumbnail view.
File list view
9 To view a file list move the joystick up / down until "View File List" is highlighted.
10 Press the joystick.
11 Press softmax 1 resp. 2 to browse the file list.
12 Move the joystick up or down to select a file.
13 Press the joystick to view the selected photo in full view.
14 Press the joystick again to return to the file list.
4 General Instructions
4.1 General Instructions
1 After having switched off the unit, wait 1 minute before turning it on again.
2 Do not bump the unit while it is powering up or down.
3 Do not use the device on 2500m (7500 ft) above sea level or higher. The hard disc drive may get damaged when used at higher levels and this may lead to a loss of data.
4 Use only the power supply that was delivered with the unit. Operating the device at another voltage or current than specified, may damage it.
In order to prevent any loss of data, the GVPE provides the possibility to backup the data to an external hard disk, such as the JOBO mobile hard disk Giga One, via the USB-2-OTG connection.
4.2 Buttons "Home", "Back" and "Settings"
Home
Wherever you are in the menus of the GVPE, the "Home" button brings you back to the starting screen. This is convenient both if you want to start a new action or got lost in the menu structure.
On the "Home" screen you can see the battery status (upper left corner) and the amount of free disk space (upper right corner). Both data can be displayed as absolute values or as percentage.
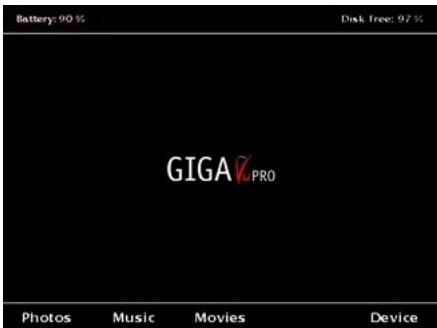
Fig. 4.1: "Home" screen.
To change the display press the "Settings" button.
A screen as depicted in fig. 4.2 will pop up.
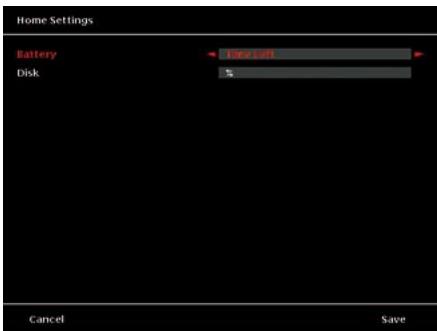
Fig. 4.2: Screen "Home Settings".
Move the joystick up / down to select an item and move the joystick left / right to select another option.
To save the new settings, press softkey 5, "Save".
To leave the menu without saving, press softmax 1, "Cancel".
- Battery: Choose between " % " oder "Time Left".
The battery status indication expressed in % is rather accurate. The indication of the time left is an estimation, because the power consumption of the GVPE depends on the kind of activity. For example, playing music files will consume much less energy than playing video files via a TV or flat screen monitor. The time left is obtained by performing a calculation taking into account the battery status and the average consumption. It is provided for easiness but will be less accurate than the % readings.
- Disk: Choose between "%" or "GB Left".
Back
This button brings you one step higher in the menu hierarchy. In most of the cases, this is a direct step back. As some operations need certain commands, in these cases you will be routed to the needed interface screen.
Settings
This button has a function whenever the orange LED inside the button is on. The LED goes on when the menu displayed provides some context sensitive settings that can be changed. Mostly these are options you can adjust to tailor the user interface to your specific needs.
In any case use the joystick up / down to select the item you want to change. Use the joystick left / right to view and select a new setting. Furthermore, two functions are always available:
To save the new settings, press softkey 5, "Save".
- To leave the menu without saving new settings, press softmax 1, "Cancel".
4.3 How to Select Content
In many cases you will have to select pictures or songs for copying, deleting, viewing etc. In all cases the same selecting mechanism is used which is described below:
Selecting files
For selecting pictures you have two options: thumbnail selection or file list selection. For all other types of content i.e. music, movies and data, only the file list selection is available. In both cases a small rectangle in front of the file name resp. at the top left corner of the thumbnail indicates that this picture is selected.
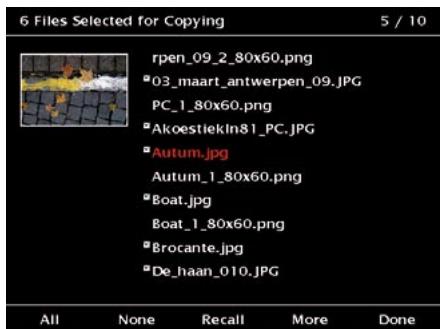
Fig. 4.3: Files selected in "file list selection" mode.
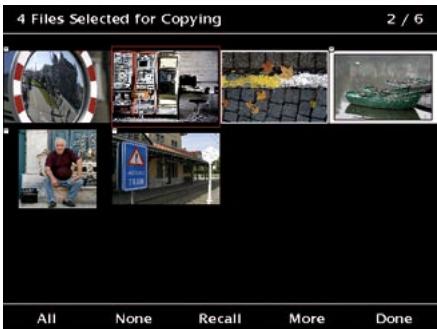
Fig. 4.4: Files selected in "thumb view selection" mode.
You can use the joystick to navigate through the files. Use the joystick up / down to go through the file names one by one. Use the joystick left / right to advance one page at the time. Pressing the joystick will toggle the actually highlighted file from selected to not selected resp. the other way round.
The softkeys offer the following actions:
Softkey 1, "All":
Selects all files.
Softkey 2, "None":
De-selects all files.
In case you only want to copy a few files, first use this option and then manually select the files you need as described above.
Softkey 3, "Recall":
Recalls the previous selection on this album. For each album, the GVPE remembers the last selection you made. If, for example, you select pictures for a slide show, you can re-use this selection later on for printing the same pictures.
Softkey 4, "More":
Leads to more options.
First layer: All - None - Recall
Second layer: Prev - Next - GoTo
Third layer: From - To
Second layer:
Softkey 1, "Prev":
This command will bring you to the previous page of thumbnails / file list.
Softkey 2, "Next":
This command will bring you to the next page of thumbnails / file list.
Softkey 3, "GoTo":
Use the GoTo command to jump directly to a specific file.
Third layer:
The From - To option allows you to select or de-select a continuous block of files. If the chosen files were not selected prior to the action, they will be selected afterwards. If the
chosen files were selected prior to the action, they will be de-selected afterwards.
If the block contains a mix of selected and non selected files prior to the action, the selection will be inverted afterwards.
To select files with the From-To method, follow the steps below:
- Press softmax 3, "Select".
- Press "None" to deselect all files.
- Press "More" to enter the 3rd layer.
- Move the joystick to the first file of the block you want to select.
- Press the joystick.
- Press softmax 2, "To".
- Use the joystick to highlight the last file of the block. In order to move to the last file of a selection you can use also the softmax "More", and the 2nd layer softkeys "Prev", "Next" and "GoTo".
- When the last file of the block is highlighted, press softmax 2, "To".
- To finalize the operation, press softmax 5, "Done".
Default settings for selections
By factory default, the GVPE will select all data files when entering the selection process. This default starting condition can be modified by pressing the "Settings" button after the selection screen appeared.

Fig. 4.5: Screen "Selection Settings"
For each type of file (photos, music, movies and other files) the starting conditions can be set to "Select All", "Select None" or to "Recall last selection".
For photo view you can choose between thumbnail or file list view as default method for the selections.
4.4 How to Use the Keyboard
Whenever you need to enter text (e.g. when renaming an album or editing keywords), a keyboard screen will be displayed.
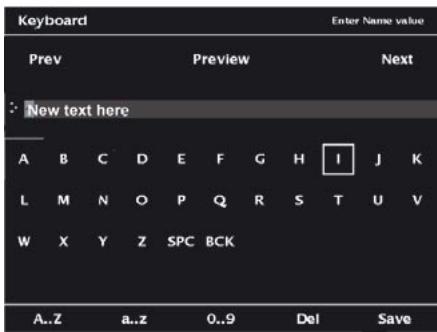
Fig. 4.6: Screen with keyboard.
At the top of the screen there is a text entry field. Left to it there is an indication of the directions in which the joystick can be moved.
Use the joystick to select a character from the displayed list. The softkeys 1 to 3 allow you to switch between lower case, upper case and numeric characters. Press the joystick to add the selected character.
A text cursor will indicate the position where the character will be added. If you want to change the text cursor's position, move the joystick upwards until the position indicator shows that you are in the text entry field. Then use the joystick left-right to change the cursor position.
To enter a space, move the cursor to the "SPC" item and press the joystick.
To delete the character immediately before the cursor, move the cursor to the "BCK" item and press the joystick.
When the cursor is in the text entry field, the cursor turns into a white block.
To delete the character at the current cursor position press softmax 4, "Del".
In case the text is longer than one line, the cursor jumps to the first character when pressing the joystick in the position "Prev". In case the text is longer than one line, the cursor jumps to the last character when pressing the joystick in the position "Next". A preview of the complete text can be seen when pressing the joystick in the position "Preview". In this mode press softmax 5 to return to the keyboard from the preview.
To finally save the typed text, press softkey 5, "Save".
4.5 Use external keyboard
Whenever you need to enter text (e.g. when renaming an album or editing keywords), a keyboard screen will be displayed. You could also plug an external USB keyboard in the USB OTG slot and use the external keyboard for these functions as well.

Abb. 4.7: Figure screen with keyboard.
Plug in the USB plug of the external keyboard into the OTG slot of GVPE (see Fig. 2.4). The keyboard keys F1 till F5 are mapped on the 5 softkeys The keyboard arrow keys up, down, left, right are mapped on the joystick navigation The keyboard enter key mapped on the joystick (press button), so you can also use the keyboard for the rest of the navigation and for entering text.
5 Basic Settings
There are some basic settings such as the language or the owner's info that are independently from any other data management.
To check or change these basics, please follow the steps below:
1 Press the "Home" button.
2 Press softmax 5, "Device". The screen depicted in fig. 5.1 will be displayed. Use the joystick up / down to select one of the items.
All items are described in this chapter apart from the first item (see chapter 6.2, "Copy data from ou to a computer") and the second last item (see chapter 6.4, "Disk management").
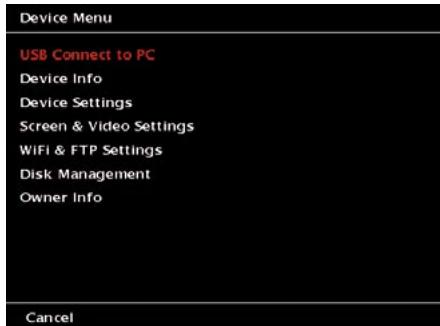
Fig. 5.1: Screen "Device Menu".
5.1 Device Info
The "Device Info" screen gives you an overview of the content archived on your GVPE. It also shows the remaining disk space, the battery status, the software version number and the actual color profile.
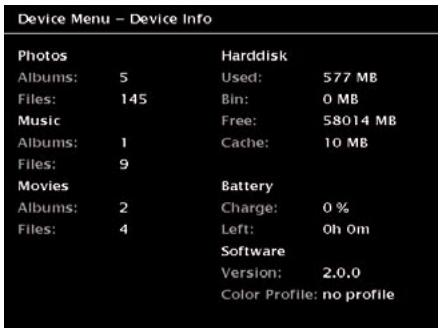
Fig. 5.2: Screen "Device Menu - Device Info".
5.2 Device Settings
This menu is used to adjust some basic device settings. Use the joystick up / down to select one of the items.
To save the new settings, press softkey 5, "Save".
To leave the menu without saving new settings, press softmax 1, "Cancel".
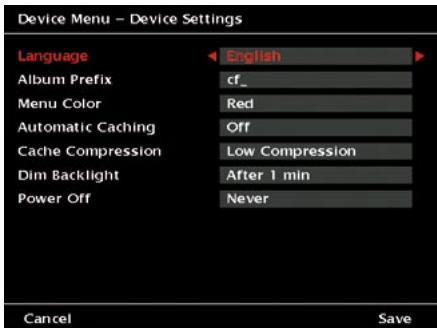
Fig. 5.3: Screen "Device Menu - Device Settings".
- Language: Select the user interface language. Use the joystick left / right to select your preferred language.
- Album Prefix: Define the prefix for all
albums that will be copied from CF card. Whenever you copy data from a CF to the GVPE, the device will create a new album using this album prefix complemented with a number as album name. Factory default is "cf_". You can change it to any combination of letters. To change the prefix, move the joystick to the right. Then a keyboard will appear and you can enter your personal prefix. See chapter 4.3 for keyboard description.
- Menu Color: Select the color used for highlighting items. Use the joystick left / right to select your preferred color.
- Automatic Caching: Define whether pictures are generally cached or not. Caching the pictures means that previews are generated in order to shorten the time until you see a picture, for example in a slide show. These cached photos require some additional disk space. Use the joystick left / right to select your preferred setting.
On: Whenever a picture is viewed for the first time it will be cached. Note however that the GVPE does not scan all albums for caching automatically. If an album is opened and only a few pictures are viewed, only these will be cached.
Off: No automatic caching is performed when viewing pictures. You still may cache any album by selecting it and only cache these pictures. See chapter 7.2.1, "Generate previews", for more details.
- Cache compression: Define the compression of the cached pictures. Use the joystick left / right to select your preferred setting. The higher the compression, the smaller the files generated will be. So in order to save disk space choose a high compression.
- Dim Backlight: Enter the time after which the backlight will be dimmed. Use the joystick left / right to select your preferred
setting. If the backlight will be dimmed, press any button to reactivate the screen.
7. Power Off: Enter the time after which the unit will be switched off automatically. Use the joystick left / right to select your preferred setting.
Dimming the backlight reduces battery consumption. If you enter a value other than "Never" it is recommended to select a value other than "Never" in the "Power off" section. Otherwise, dimming the screen and not automatically switching off the unit after some time introduces the risk of not noticing that the unit is still on and draining the battery completely.
5.3 Screen & Video Settings
This menu is used to adjust some settings concerning the video output. Use the joystick up / down to select one of the items.
To save the new settings, press softkey 5, "Save".
To leave the menu without saving new settings, press softmax 1, "Cancel".
Fig. 5.4: Screen "Device Menu - Screen & Video Settings".
- Video Output: Select the TV standard "PAL" or "NTSC" before watching photos or
videos on a TV.
Use the joystick left / right to select the TV standard.
- LCD Brightness: Adjust the brightness of the screen.
Use the joystick left / right to select the preferred brightness. The brighter the screen, the more energy is needed.
- Decode Quality: Adjust the quality for decoding.
A lower quality means faster decoding, a higher quality returns a slightly better image rendition at the cost of some extra time.
Use the joystick left / right to select your preferred decode quality.
- Color Profile: Select the preferred color profile for watching photos.
Use the joystick left / right to select your preferred setting.
5.4 WiFi & FTP Settings
The GVPE can be incorporated in your wireless network by inserting an optional WiFi CompactFlash card (see chapter 12, "Available Accessories"). If you work with the recommended WiFi CompactFlash card there will be no problem, but the GVPE is not guaranteed to work with all brands of WiFi CompactFlash cards. Therefore check the JOBO website (www.jobo.com) for approved types first or try the type of your choice before you buy. Trying out a WiFi CompactFlash card will not damage the GVPE.
In the "WiFi & FTP Settings" menu as shown in fig. 5.5 the basic settings for the wireless data transfer are adjusted. Use the joystick up / down to select one of the items.
To save the new settings, press softkey 5, "Save".
To leave the menu without saving new settings, press softmax 1, "Cancel".
Fig. 5.5: Screen "Connect Menu - WiFi & FTP Settings".
- SSID: Enter your network name here. This network name will be given to you by the administrator of the current network. To enter the name, move the joystick to the right. Then a keyboard will appear and you can enter the letters. See chapter 4.3 for keyboard description.
- Mode: Depending on the type of network select "adhoc" or "infrastructure".
Use the joystick left / right to select the network type.
Adhoc: Use this setting if you connect the GVPE directly to a PC or a local network. Infrastructure: Use this mode if you look for an access point (Hot Spot).
- Channel: Select the channel according to the WiFi network router. Please consult the router's user manual for this.
Use the joystick left / right to select the correct channel.
- WEP: Select the type of encryption according to the network router. Please consult the router's user manual for this. Use the joystick left / right to select the mode in which the key can be decrypted.
- Key: Enter the key for the WEP here. Please consult the router's user manual for this. To enter the key, move the joystick to the right. Then a keyboard will appear. See
chapter 4.3 for keyboard description.
- IP Address Mode: Select the IP address Mode needed. Please consult the router's user manual for this.
Use the joystick left / right to select the correct mode.
DHCP: Select this option when a DHCP server is used.
Static IP: When operating the GVPE without a DHCP server, the administrator defines a network address for every user in the WiFi network. You have to enter this static address in the next item.
- IP Address: Enter the IP address here. Please consult the router's user manual for this.
To enter an IP address, move the joystick to the right. Then a keyboard will appear and you can enter the numbers. See chapter 4.3 for keyboard description.
-
FTP Album Prefix: Define the prefix for all albums that will be copied via WiFi (FTP). When you connect the GVPE to a computer or network and copy data on the GVPE via WiFi, it will create a new album using this album prefix complemented with a number as album name. Factory default is "ftp_. Instead you can enter any combination of letters and numbers. To change the prefix, move the joystick to the right. Then a keyboard will appear and you can enter the new prefix. See chapter 4.3 for keyboard description.
-
After Upload: Define what happens after the upload is completed.
Use the joystick left / right to select your preferred action.
5.5 Owner Info
The first three items in this section allow you to enter your name, e-mail address and cell phone number. This shall be helpful in case you lose your device.
The last two items allow you to enter an
author's name and a copyright notice. They will serve as default settings for the comments resp. EXIF data that can be added to photos. See chapter 7.10.2, "Add Comments" for more information.
To save the new settings, press softkey 5, "Save".
To leave there menu without saving new settings, press softmax 1, "Cancel".
Fig. 5.6: Screen "Device Menu - Owner Info".
- Name: Enter your name here. To enter text, move the joystick to the right. Then a keyboard will appear and you can enter the letters. See chapter 4.3 for keyboard description.
- e-mail: Enter your e-mail address here. To enter the address, move the joystick to the right. Then a keyboard will appear and you can enter the letters. See chapter 4.3 for keyboard description.
- Cell Phone: Enter your phone number here. To enter a number, move the joystick to the right. Then a keyboard will appear and you can enter the letters. See chapter 4.3 for keyboard description.
- Author Name: Enter your name for copyright purposes here. This information will be part of the EXIF data if you export a photo later.
To enter text, move the joystick to the
right. Then a keyboard will appear and you can enter the letters. See chapter 4.3 for keyboard description.
- Copyright: Enter your copyright code, company name or name here. This information will be part of the EXIF data if you export a photo later. To enter text, move the joystick to the right. Then a keyboard will appear and you can enter the letters. See chapter 4.3 for keyboard description.
5.6 Reset Functions
Should the GVPE lock up during operation, the reset function is activated by pressing softkey 1, softkey 5 and the On / Off button simultaneously for a few seconds.
To reset the GVPE during normal operation, follow the steps below:
1 Press the "Home" button.
2 Press softmax 5, "Device".
3 Use the joystick up / down and select "Disk management".
4 Use the joystick up / down until "Reset All Settings to Factory Default" is highlighted.
5 Press the joystick to reset all settings.

Be aware that "Reset All Settings to Factory Default" includes clearing user information (name, copyright etc.) and resets all counters. There will be no double check. Pressing the joystick immediately deletes all your personal settings.
This function will restore all settings to the factory defaults. This function will not remove any content such as photos, movies or music.
6 Data Import, Data Export and Disk Management
There are several ways how to transfer data from or to your GVPE:
- Copying data from or to a memory card.
- Copying data from or to a computer using the USB 2 connection.
- Copying data from or to a computer network using the WiFi connection.
- Copying data from or to an external device (e.g. camera, hard disk, other GVPE) using the USB2 OTG connection.
Whatever device is chosen, it is important to know that the GVPE file management works with directories called "Albums". There are "Photo" albums, "Movie" albums and "Music" albums. Any time you copy content from an external device to the GVPE, it will create a new album. You can rename and delete albums and you can move content from one album to another. If you connect the GVPE to a computer, all albums will show up as subdirectories. See chapter 6.2, "Copy data from or to a computer" for more details.
6.1 Copy Data from or to a Memory Card
6.1.1 Import data from a Memory Card
The GVPE has a CompactFlash card slot that supports both Type I and Type II (MicroDrives) cards. Other cards like SD / MMC, xD and MemoryStick can be used with an optional adapter. See chapter 12, Available Accessories for more information.
To copy data from a memory card switch on the
unit first and then insert the memory card resp. the adapter into the CompactFlash card slot.
After a few seconds a screen as depicted in fig. 6.1 will pop up.
Fig. 6.1: Screen "Copy Memory Card to Hard Disk".
You can tailor the copy process to your needs by adjusting five options. Move the joystick up or down to select a function and move the joystick to the left or right hand side to select an option.
If the memory card is already inserted, you can always go to the copy screen by first going to the "Home" screen and then pressing the "Back" button.
To start the copy action, press softmax 5, "Start". During the copy process the device will provide detailed information on the copy process. The copy process can be stopped by pressing softmax 4, "Stop".
To leave there menu without copying any data, press softmax 1, "Cancel".
1. Copy to Album:
The GVPE will create a new album every time a memory card is inserted. The name of the new album is a combination of a standard prefix and a number. You can change the prefix and the
size of the number. See chapter 5.2, "Device Settings" for more details.
Instead of creating a new album, you can copy the data from the memory card into an album already existing. Use the joystick left / right to select one of the existing albums.
The GVPE will copy all files, regardless of type, into this album. The files will automatically be saved in separate subdirectories called "Photos", "Music", "Movies" and "Data".
2. Copy Action:
For the copy process you may choose from three options. Use the joystick left / right to select one of the options.
- Copy only:
In this mode, the GVPE will copy all selected files.
- Copy and verify:
In this mode, the GVPE will copy all selected files. Afterwards the GVPE will automatically start a verification process. This comprises a bit per bit comparison between the files on the hard disk and the files on the memory card. After completion a screen with statistics is displayed. Because all files have to be checked completely this takes about as much time as the copy process.
3. Copy Mode:
For the copy mode you may choose from two options. Use the joystick left / right to select one of the options.
- Fast, no preview:
This is the default value and it is the fastest way to copy the data from the memory card. Previews are not shown in this mode. In fast copy mode the complete memory card is copied. There is a progress indication but no previews are shown in this mode.

To obtain maximum copy speed completely empty or re-format the memory card after each download.
>>!<<
In order to maximize speed, the GVPE will determine the memory card's speed grade before starting the copy process. Some media adapters designed for using SD or MS memory cards in CompactFlash slots may disturb this mechanism and as a consequence copying may be slowed down. In case you experience problems, use the "Show Previews" copy mode.
- Show Previews:
When you like to see the previews during the copying process, choose this option.
>>!<<
It is strongly advised not to switch off the unit during copy actions. Doing so may corrupt the data structure on GVPE's hard disk drive. If the unit accidentally powers down during copying, carefully check if all files were copied and then run the disk repair utility (see chapter 6.4, section "Check Hard Disk for Errors").
4. Action when done:
This function defines what GVPE will do after the copy action is complete. Use the joystick left / right to select one of the four options.
- Do Nothing:
The GVPE will stay switched on and wait for user interaction.
- Switch off:
The GVPE will switch off when it has performed the actions defined in the "Copy Action" setting. This can be very convenient because you can leave the unit unattended and go on shooting pictures, for example. On your return you can power on the unit and check your data.
-Beep:
The GVPE will produce a beep at the end of the copy process.
- Beep + Switch off:
The GVPE will produce a beep at the end of the copy process and then switch off.
5. Generate cached views:
After copying, the GVPE can generate so called "cached views". They can be helpful for the selection of pictures, because the pictures will appear on the screen without delay immediately after they have been selected. The caching process may take some time, especially when copying albums that contain many pictures. Use the joystick left / right to select one of the two options.
- No
As default this function is switched off. No cached views are generated.
-Yes
Cached views are generated from every file that enables this action (e.g. JPEG, TIFF, RAW).
Other file formats are ignored. As generating the cached views takes some time, it is advised to connect the GVPE to the mains using the AC power supply.
6. Softkey 3, "Select":
The GVPE displays how many files are selected for copying. In case you will not copy all files, press this softkey to select pictures. You may tailor the "Select" process to your needs and copy files more selectively if wanted. See chapter 4.2, "How to select content" for possible settings and options.
#
After the copy process is completed, the GVPE shows the status on the screen. This will be shown only once so please check this before you press any button and proceed using the unit.
6.1.2 Export Data to a Memory Card
To export pictures to a memory card do the following:
To copy data to a memory card insert the memory card resp. the adapter into the
CompactFlash card slot. Then follow the steps below:
1 Press the "Home" button.
2 Press softmax 1, "Photos".
3 Use the joystick up / down until the album you want to copy is highlighted.
4 Press softmax 5, "Manage".
5 Use the joystick up / down until "Copy Pictures to CF Memory Card" is highlighted.
6 Press the joystick (enter) and you will see the screen as depicted in fig. 6.2.
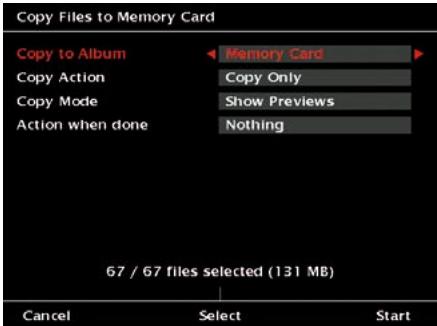
Fig. 6.2: Screen "Copy files to memory Card".
Here you can define the following settings:
- Copy to Album: Use the joystick right / left to select the option "Memory Card".
- Copy Action: See chapter 6.1.1 for description.
- Copy Mode: See chapter 6.1.1 for description.
- Action when done: See chapter 6.1.1 for description.
- Softkey 3, "Select": See chapter 6.1.1 for description.
To start the copy action, press softkey 5, "Start".
To leave there menu without copying any data, press softmax 1, "Cancel".

This function can also be helpful when you want to copy files from one album to another on your GVPE. In this case, select the album you want to copy your data to instead of selecting the memory card.
6.2 Copy Data from or to a Computer
6.2.1 Connect the Device to a Computer
USB connection
The fastest data exchange between the GVPE and a computer is provided when you use the USB 2 connection. In this case you need the long cable with the USB plug.
To connect the units do the following:
1 Switch on the GVPE.
2 Press softmax 5, "Device".
3 Use the joystick to select "USB Connection To PC". A screen as shown in fig. 6.3 will appear.
4 Press the joystick to select this.
Connect Menu - US8 to PC
You can now plug the USB cable in the PC. Use the upper USB connector on the right side of the device.
Press Disconnect when you are done transferring files.
Disconnect
Fig. 6.3: Screen "Connect Menu - USB to PC".
5 Plug the USB cable into the upper USB connector.
6 Wait a few seconds.
7 A new hard disk device, called GVPE, will be visible on the computer. On this hard disk you will find the directories:
- Device
MemoryCards
-WiFi
-PC
Now you can exchange data between the computer and to the GVPE.
8 When all files are exchanged, press softkey 5, "Disconnect", before unplugging the USB cable.
WiFi connection
Alternatively you can connect the devices via a wireless LAN using the WiFi adapter card. To establish a connection put the WiFi card into the slot for the CompactFlash card and adjust the settings for WiFi and FTP according to chapter 5.4.
6.2.2 Import Data from a Computer
All media that is imported into the GVPE via the PC should be copied in the directory "PC". Copying the files in the correct directory is essential, because the GVPE will only display data that are placed in the correct subdirectories. Files stored on other parts of the disk will be ignored.
The directory "PC" is split into the subdirectories: Movies, Music and Photos.
Photos
The "Photos" directory contains one or more subdirectories. Each subdirectory represents an "Album".
If you want to copy pictures to the GVPE do the following:
1 Create a new subdirectory on the PC under "Photos".
2 Rename this new folder with the name you want to use. The complete path is: GigaVu\pc\Photos\NewAlbum.
3 Copy your photos from the computer to this subdirectory.
Movies
The "Movies" directory contains one or more subdirectories. Each subdirectory represents an "Album".
If you want to copy movies to the GVPE do the following:
1 Create a new subdirectory under "Movies".
2 Rename this new folder with the name you want to use. The complete path is: GigaVu\pc\Movies\NewAlbum.
3 Copy your movies from the computer to this subdirectory.
Music files
The "Music" directory contains one or more subdirectories. Each subdirectory represents an "Album".
If you want to copy music files to the GVPE do the following:
1 Create a new subdirectory under "Music".
2 Rename this new folder with the name you want to use. The complete path is: GigaVu\pc\Music\NewAlbum.
3 Copy your MP3 files from the computer to this subdirectory.
6.2.3 Export Data to a Computer
To export data from the GVPE to a computer, connect the devices as described in chapter 6.2.1. Then select the files you want to copy from the GVPE. On the GVPE, the files are split in directories according to the following structure. This should help you to easily find the files you want to copy to your PC.
Device
- Keywords
ctites.txt <- Keywords for photos (see chapter 7.10.4)
+RecycleBin Folder1 Folder2 ... Folder n
+Restored
File 1
File 2
···
File n settings.backup swap.img
MemoryCards
+cf_00001
- Cache <- Cached views from folder cf_00001
- Data <- Data from folder cf_00001
- Photos <- JPEG, RAW and TIFF files from folder cf_00001
- Music <- MP3 files views from folder cf_00001
- Movies <- MPEG2 / MPEG4 files from folder cf_00001
saved
selection<-Last selection made for files in folder cf_00001
+cf_00002
**
+cf_99999
WiFi
+ftp_00001
+ Cache
+ Data
+ Photos
+ Music
+Movies
savedselection
+ftp_00002
··
+ftp_99999
pc
+Movies
+movie_folder_01
+movie_folder_02
**
+movie_folder_nn
- Music
+music_folder_01
+music_folder_02
- Photos
···
+music_folder_nn
+ photo_folder_01
+ photo_folder_02
**
+ photo_folder_nn
6.3 Backup Data
To copy data from or to an external device like a camera, a mobile hard disk or another GVPE, use the lower USB-interface to connect the devices. See Fig. 2.5 for a detailed instruction.
When an external hard disk drive is connected to the GVPE's USB 2 OTG connector, you can backup a certain album to another device such as the JOBO Mobile Hard Disk Giga ONE. To establish a connection and backup the data proceed as described below:
1 Press to the "Home" button.
2 Press softmax 1, "Photos".
3 Use the joystick up / down until the album you want to backup is highlighted.
4 Press the softmax 5, "Manage".
5 Use the joystick up / down until "Copy Album to External Disk" is highlighted.
6 Press the joystick to copy the current photo album to this disk drive.
In the related Info screen it will be indicated that this album has been copied to a backup hard disk.
6.4 Disk Management
This chapter describes some general data managing operations such as to delete all cached views, empty the Recycle Bin, check the hard disk for errors, and how to reformat the hard disk.
To initiate these actions, follow the steps below:
1 Press to the "Home" button.
2 Press softkey 5, "Device".
3 Use the joystick up / down until "Disk Management" is highlighted.
4 Press the joystick to select this item.
5 The screen will show the items as depicted in fig. 6.4 below. Use the joystick up / down to select one of the items.
Device Menu - Disk Management
Empty All Recycle Bins
Remove All Cached Views
Check Hard Disk for Errors
Reformat Hard Disk
Cancel
Fig. 6.4: Screen "Device Menu - Disk Management"
- Empty All Recycle Bins: Empties the Recycle Bin.
While browsing you can remove files from an album by sending them to the Recycle Bin. Normally these are files you want to delete. This option deletes all files you put into the recycle bin at once. This will free disk space. Press the joystick when the option is highlighted to empty the Recycle Bin. When the Recycle Bin is empty, the "Home" screen will appear.
>>!<<
When you press the joystick while the "Empty Recycle Bin" option is highlighted, all content in the recycle bin will be deleted immediately.
To check the files to be deleted, you can view the content of the Recycle Bin by selecting it in the Photo -> Select Albums (resp. Music -> Select Albums / or Movies -> Select Albums)
menus. If you changed your mind and want to keep the file anyway, press softmax 5 to restore it. Restore will move the file from the recycle bin to an album called "Restored".
You can check the content of the "Restored" album by selecting it in the Photo -> Select Albums (resp. Music -> Select Albums / or Movies -> Select Albums) menus. Restored files will end up in this album, regardless which album they initially belonged to.
- Remove all Cached Preview Files: Deletes all cached preview files.
While watching photos, the GVPE generates cached views to shorten the loading time for the photos (see chapter 7.2. for more details). Use this command to remove all cached preview files that were generated by your GVPE. Press the joystick when the option is highlighted to remove all cached views. This will free up disk space, but makes viewing of albums slower. When all cached preview files are deleted, the "Home" screen will appear.
>>!<<
When you press the joystick while the "Remove all Cached Previews" option is highlighted, all cached views will be deleted immediately.
- Check Hard Disk for Errors: This function will check the hard disk for faulty clusters and repair them.
If you experience problems with the hard disk of your GVPE, you should first run this function. Some disk errors can occur when the unit is switched off or the USB connection is broken during data transfers. Running this function will not remove any valid data from GVPE. When the repair process is done, the "Home" screen will appear.
>>.<<
If problems persist consider using the re-format hard disk drive function. Before re-formatting the hard disk, a complete data backup must be made!
- Re-format Hard Disk Drive: Formats the hard disk
This function allows you to re-format the GVPE's hard disk drive without connecting it to a computer. Re-formating will restore the disk to the factory default layout, including the generation of all directories.
>>
Using this function will delete ALL images, music files, movies and data from your GVPE. This function should be used only if you experience serious trouble with the disk or are unable to connect the device to your computer.
>>
It is not recommended to re-format the GVPE by using some computer applications or operating system functions. The GVPE only works with FAT32 formatted disks.
7 Managing Photos
7.1 Some Remarks about File Formats
Cameras and computers can store photos in different file formats. Most use JPEG compression because this decreases the file size. As the JPEG compression process is an irreversible data operation, this compression is always related with a certain loss of data. Nevertheless, for the vast majority of applications, the JPEG format is sufficient and delivers good results.
For professional or semi-professional photographers it is sometimes important to keep the whole information. Therefore some cameras provide the possibility to store pictures in RAW format. RAW files contain all the information that the camera's sensor recorded at the time of exposure, without any compression or post-processing. In many cases the RAW file also contains a scaled down "thumbnail" version of the picture. Due to their nature, RAW files are much larger and more difficult to process. Although GVPE can display most types of RAW files, there are limitations and not all features available for JPEG files can be used with RAW files:
- In "Picture View" display mode, the GVPE will only display the RAW file's embedded thumbnail. In most cases this is not a problem as these thumbnails are large enough.
- You can use the zoom function on RAW files. But depending on the amount of processing needed this may take somewhere between 30 seconds and up to a few minutes!
-
RAW files can be used in slide shows only when they contain an embedded JPEG picture.
-
RAW files can not be rotated.
-You cannot print RAW files from the GVPE.
-You cannot add keywords to RAW files.
-You cannot use RAW files for the "Dust Detection" feature.
Pictures that were originally scanned or produced on a PC may be stored in TIFF format. Most of these files will be decoded.
In case a TIFF file will not be decoded, the reason mostly is, that a computer program applied a proprietary compression to the file and stored the result in a TIFF file structure.
7.2 Previews
Each time you want to view a picture, the GVPE performs a number of actions. The file is read from the disk, then the JPEG file is decoded, rescaled to fit the screen resolution and finally color corrected to match the color space used by the camera (sRGB or RGB). Each of these steps takes some time. The higher the resolution of the camera and thus the larger the file, the more time it takes.
The GVPE can however, if wanted, store the final result of all these manipulations on disk. For subsequent viewing the GVPE can load this "screen dump". This increases the viewing and browsing speed considerably. This method is often called "caching". There is no loss in viewing quality. The only drawback is that some amount of disk space is needed for storing the previews.
7.2.1 Generate Previews
There are two ways to generate cached previews:
Automatic: a preview is generated automatically for each picture you view. For details see chapter 5.2, "Device Settings" for details.
Manual: You can instruct your GVPE to generate previews for the current photo album.
To do this, follow the steps below:
1 Press "Home" button.
2 Press softmax 1, "Photos".
3 Use the joystick up / down until the album is highlighted.
4 Press softmax 5, "Manage".
5 Use the joystick up / down until "Generate cached Views" is highlighted.
6 Press the joystick to select this option.
7 The cached views will be generated and shown on the screen as soon as they are completed.
8 When all cached views are generated, press softkey 5, "Done" and you return to the "Manage" menu.
7.2.2 Delete Previews
If an album is not viewed frequently, you can recover the disk space by deleting the previews without affecting the original files.
To delete the previews of a special album, follow the steps below:
1 Press "Home" button.
2 Press softmax 1, "Photos".
3 Use the joystick up / down until the album is highlighted.
4 Press softmax 5, "Manage".
5 Use the joystick up / down until "Clear Cached Views" is highlighted.
6 Press the joystick to select this option.
7 You will be asked whether you really want to delete the previews.
8 To delete the files, press softmax 5, "Clear" and you return to the "Manage" menu.
7.3 Select a Photo Album
On the "Home" screen you find 4 softkeys labelled "Photos", "Music", "Movies" and "Device". After pressing the softmax key 1, "Photos", a list of all albums available on the GVPE will be shown. Fig. 7.1 shows a sample.
Use the joystick up / down to go through the albums one by one. The numbers in the upper right corner show how many albums exist and which one is highlighted. To select an album, press the joystick. Only one album at the time can be selected. The name of the currently selected album is displayed in the upper part of the screen for all actions in this album.
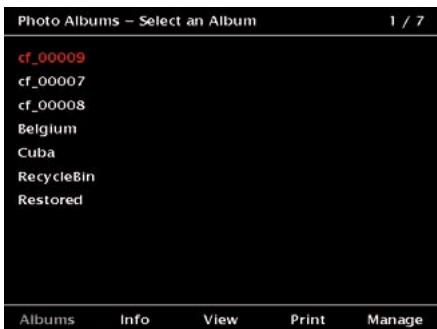
Fig. 7.1: Screen "Photo Albums - Select an Album".
The softkeys have the following meaning:
- Softkey 1, "Albums": A list of all available albums is shown. To select an album, press the joystick.
- Softkey 2, "Info": This screen summarizes some information about the current photo album. The screen indicates the number of files, the storage capacity needed for this album etc. You will always see a thumbnail view of the first and the last photo of this album.
Move the joystick left / right or up / down to switch to the next album. Pressing the joystick will select that album.
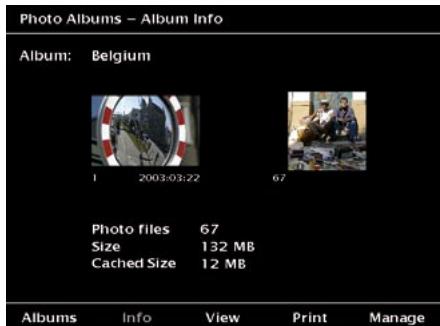
Fig. 7.2: Screen: "Photo album Info".
- Softkey 3, "View": This button will bring you to the several viewing modes. See chapter 7.4.1 for more detailed information.
- Softkey 4, "Print": This has to be chosen when a photo shall be printed via the "PictBridge" mode. See chapter 7.8 for more information.
- Softkey 5, "Manage": This menu offers options for data management and administration.
Once you selected an album by pressing the joystick, the GVPE will automatically switch to picture viewing mode. By default, every time you select an album, the device will "Ask" you in which format you want to view these pictures. You can chose from the options "Thumbnail", "File List" or "Picture View". The "Settings" button allows you to override this question and directly jump to the viewing mode you prefer. To do this, press the "Settings" button. Then use the joystick right / left to select the option you prefer. Confirm your selection by pressing softmax 5, "Save".
7.4 View Pictures
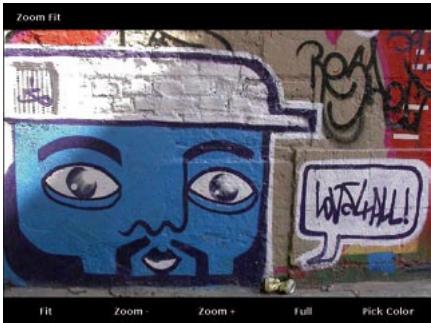
The GVPE offers different ways to view the pictures.

Fig. 7.2: Screen: "Photo Albums - View Album xxx".
If you want to view the picture as large as possible and would like to have access to the GVPE's full functionality, use the "View Pictures" mode.
The "Thumbs" and "File List" viewing modes are most convenient for locating a specific picture or fast browsing.
In "View Pictures" mode, you can view the previous or next picture by moving the joystick left or right. Because a number of pictures are buffered in the memory the changes are almost instantaneous. If you move the joystick in one direction more than 3 times successively you might have to wait about a second until the GVPE decodes the next picture. Pressing the joystick will bring you in the "Thumbs" or "File List" mode.
A "Slide Show" can be designed and presented from the GVPE as well. Se chapter 7.7 for further details.
The GVPE is able to check the camera's chip for dust. This is important mainly for those photographers who often change the lenses of their equipment. See chapter 8 for more details. By moving the joystick up/down you can hide or show the softkey prompts.
Settings for "View Pictures"
When you selected "View Pictures" and a picture is shown on the screen, there are a
few options available. You can define them by pressing the "Settings" Button.
- Overlay: In the upper left corner of the screen some text can be superimposed on the picture. Use this entry field to select what you want to see there. The possible choices are: "No Overlay", "Filename", "Date", "Comments", "Author", "Description" or "Shooting Data".
- Color: Sets the color of the overlay text.
- JPEG + RAW: Some cameras offer a JPEG+RAW mode in which all pictures are stored in JPEG format and in RAW format. While browsing it can be annoying to see every picture twice. With this setting you can specify if you want to view only the JPEG files, only the RAW files or both.
- Softkey text: By default the softmax prompts appear whenever pictures are shown. You can decide whether these prompts shall be seen by default or not. While viewing the photos, by moving the joystick up/down you can hide resp. show the softmax prompts.
7.4.1 View Picture Details
While viewing pictures you can use the softkeys for the actions displayed on the bottom of the screen as shown in fig. 7.3.
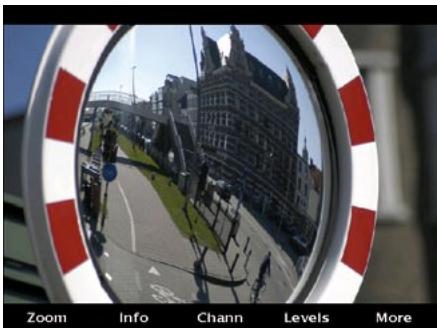
Fig. 7.3: Screen in "View Pictures" mode.
Softkey 1, "Zoom":
Zoom the picture.
Softkey 2, "Info":
Check the EXIF data and keywords.
Softkey 3, "Chann":
Have a look at the single red, green and blue channels as well as the Black&White version.
Softkey 4, "Levels":
A histogram illustrates how pixels are distributed. This is available for the full color image and for the red, green and blue channels individually.
Zoom mode
There are several zooming options. When entering the "Zoom" mode, the complete photo is shown. By moving the joystick up/down you can hide resp. show the softkey prompts.
You can either press the joystick (enter) or the "Back" button to leave the zoom mode and go back to standard picture viewing.
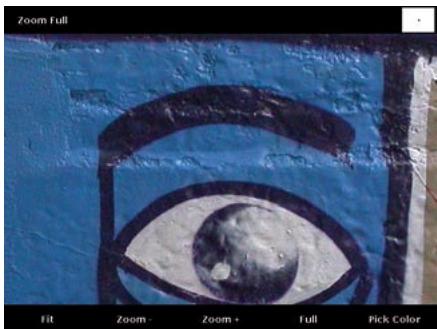
Fig. 7.4: Screen in "zoom" mode.
The GVPE always starts with decoding the full picture and keeps in memory all available information. Zooming in, zooming out and panning through the picture are then just a matter of displaying the available information. The consequence of this method is that it takes a bit longer to get the first view but that afterwards all other manipulations are rendered much faster.
This is advantageous compared to many other photo viewers. They start from screen resolution and then gradually zoom in using small steps, each taking some calculation time.
Softkey 1, "Fit":
This is the view whenever you enter the zoom mode. When you zoomed into a photo, pressing this softkey will scale the complete picture so that it fits on the screen again. The joystick can be used to switch to the previous or next picture. This is convenient if you intend to use the zoom function on subsequent pictures. Due to the fact that there is no picture buffering in this mode, viewing will be slower than in the normal "View Pictures" mode.
Softkey 2, "Zoom -":
Zoom out
Softkey 3, "Zoom +":
Zoom in
Softkey 4, "Full":
For a full resolution view.
The upper left corner will indicate the zoom ratio. The GVPE uses the file dimensions as a reference rather than its own screen resolution. Zoom "Full" means that one pixel on the screen corresponds with one pixel in the file. All other zoom ratios are related to this.
The upper right corner will indicate the position of the lower right corner of the screen in relation to the complete picture. This is
helpful when special areas of a photo shall be identified to check them for their quality. Use the joystick to navigate and bring another area of the image into view.
Softkey 5, "Pick Color":
Pressing this button will display a cross-hair cursor on the screen. Use the joystick to move the cross-hair along the screen. It reads the RGB values and displays them on top of the screen.
In this mode, softkey 5, "Pan Zoom" will indicate the way back to a operation without cross-hair.

Fig. 7.5: Screen in "Zoom" and "Pick Color" mode.
Zoom Settings
Pressing the "Settings" button will allow you to tailor the zoom function. There is only one option to be modified, that defines how to handle RAW files when zooming.
The GVPE offers two ways of zooming in RAW files, "Use Embedded JPEG" or "Use Raw Data". To understand the difference between these two modes you need some insight in how RAW files are structured. Contrary to JPEG, there is no standard defining the structure of RAW files. Every camera brand has its own format and even within one brand, files from several cameras can differ a lot.
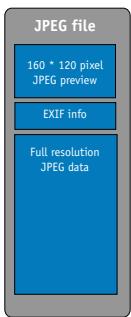

Fig. 7.6: Structure of JPEG and RAW files
A JPEG file consists of 3 parts: a small preview image used as 'thumb', a part containing EXIF information (camera brand, exposure settings etc.) and the full resolution image stored in a way as defined by the JPEG standard. A RAW file always contains the data coming from the sensor dump. This means a full resolution picture in the camera's native RAW format. On top of that most RAW files contain a small JPEG preview image, mostly about 160 pixels wide. Optionally some RAW files also contain higher resolution JPEG preview images. These can be of any size up to full resolution.
When viewing RAW files in normal picture viewing mode, GVPE will scan the file for JPEG preview images. The highest resolution JPEG found will be displayed.
When zooming you have two options:
Option 1: Use embedded JPEG:
In this case the GVPE will use the embedded JPEG preview image. This means that zooming is limited to the size of the preview image which can be much less than the camera's resolution. The advantage of this option is speed.
Option 2: Use Raw Data:
In this case GVPE will use the full resolution RAW data to generate an image. Since RAW file decoding is very computation intensive this may take somewhere between 30 seconds and up to a few minutes for each zooming process.
There may appear color differences between the two options, because RAW decoders running on personal computers offer a large amount of customization. Users can tweak parameters such as white balance, exposure, sharpening etc. to obtain the picture quality they want. Cameras use a specific setting for these parameters when they generate an embedded JPEG preview image. The GVPE also has a fixed set of parameters for this job and as a consequence there will be color differences between the two viewing options. Use the option "RAW" to check focus and details of your pictures but do not use it to judge color accuracy.
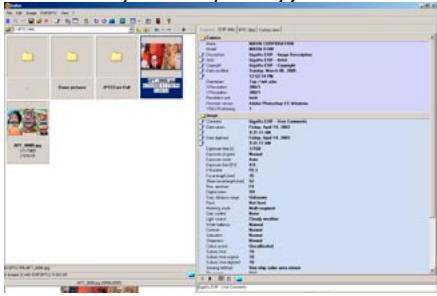
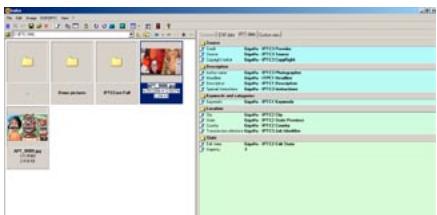
7.4.2 Show Info Data (EXIF)
When viewing pictures, you can press softmax 2, "Info", to see some basic picture info such as exposure time or focal aperture. The type and quality of data shown depends on the EXIF-data produced by the camera.
By moving the joystick left or right you can view the info for the previous or next pictures.
Softkeys 1 to 4 allow you to view different sets of EXIF data related to exposure, camera and file. Softkey 4 shows the keywords connected to this photo.
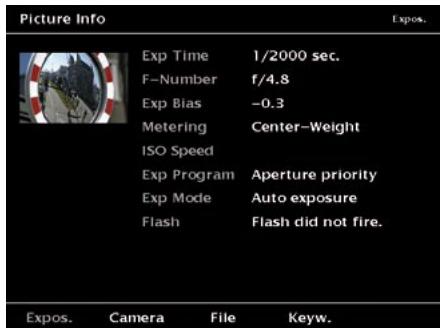
Fig. 7.7: Screen "Picture Info - Exposure".
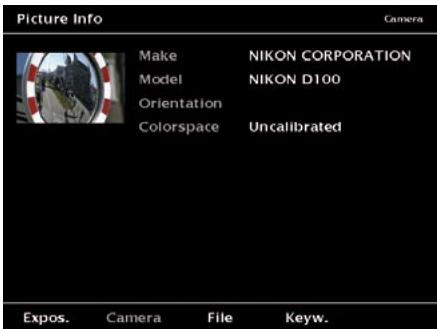
Fig. 7.8: Screen "Picture Info - Camera".
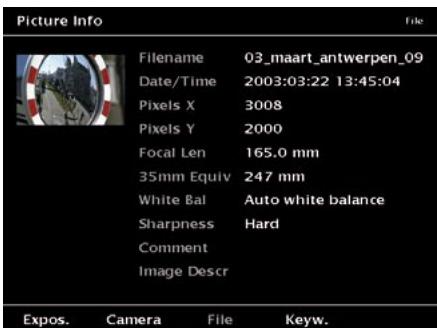
Fig. 7.9: Screen "Picture Info - File".
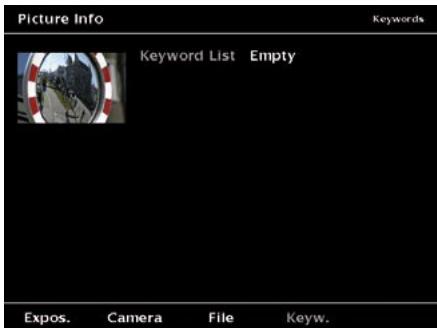
Fig. 7.10: Screen "Picture Info - Keywords".
You can either press the joystick (enter) or the "Back" button to leave the "Info" mode and return to standard picture viewing.
7.4.3 Show Color Channels
The "Channel" mode allows you to view the content of different RGB channels as well as a black and white picture. From left to right the softkeys will display: full color, red channel only, green channel only, blue channel only and B&W.
By moving the joystick left or right you can view the respective channel of the previous or next picture.
You can either press the joystick (enter) or the "Back" button to leave the "Channels" mode and go back to standard picture viewing.
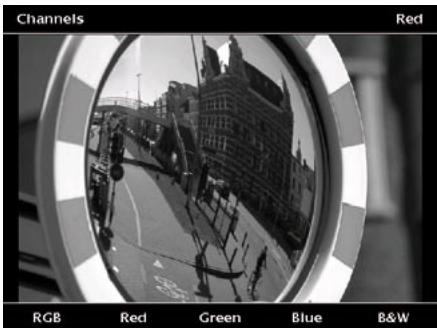
Fig. 7.11: Screen "Photo Channel - Red".
Use the "Settings" button to define how the B&W image is generated. You can either select to use the luminance channel of the picture or make your own channel mix of Red, Green and Blue channels. If the total sum (in percentage) of Red, Green and Blue is not 100% , you can use softkey 3 ( 100% ) to normalize this.
7.4.4 Show Histogram
A levels view (or histogram) illustrates how pixels in an image are distributed by showing the number of pixels at each color intensity level. Press softkeys 1, 2, 3 or 4 for the full color image and for Red, Green, Blue channels individually. Softkey 5 shows the luminance channel.
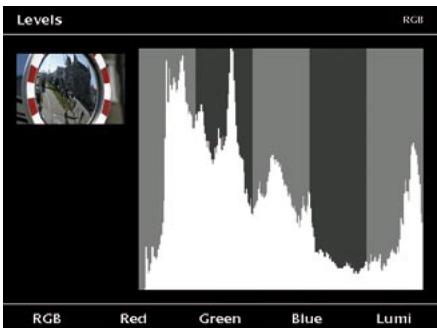
Fig. 7.12: Screen "Levels - RGB".
Again by moving the joystick left or right you can view the channels of the previous or next pictures.
You can either press the joystick (enter) or the Back" button to leave the "Levels" mode and go back to standard picture viewing
7.4.5 Rotate Pictures
Sometimes the cameras do not include the information of the orientation in their EXIF data. If you want to turn a photo from "Landscape" to "Portrait" or the other way round, press softkey 5, "More" in the picture viewing mode.
Then the softkeys get another function as shown in fig. 7.13:
Softkey 1, "CCW":
Rotates the picture counter-clockwise.
Softkey 2, "CW":
Rotates the picture clockwise.
Press the softkeys and the picture will be turned by 90^ . The GVPE will store the photo in the new, rotated version.
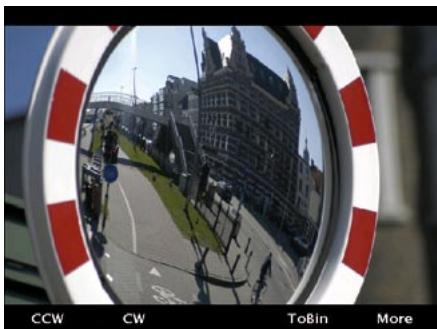
Fig. 7.13: Screen "Rotate picture".
To return to the viewing mode, press softkey 5, "More", again.
7.4.6 Delete Single Pictures and Albums
To delete single pictures from an album while viewing, press softmax 5, "More" in the picture viewing mode.
Then the softkeys get another function as shown in fig. 7.12:
Softkey 4, "ToBin":
Removes the currently selected picture from the album without asking once more and puts it in the recycle bin.
To return to the viewing mode, press softkey 5, "More", again.
To delete a complete album, follow the steps below:
1 Press "Home" button.
2 Press softmax 1, "Photos".
3 Use the joystick up / down until the album to be deleted is highlighted.
4 Press softmax 5, "Manage".
5 Use the joystick up / down until "Send Album to Bin" is highlighted.
6 Press the joystick to select this option.
7 You will be asked whether you really want to delete the album.
8 To delete the files, press softkey 5, "Delete" and you return to the "Manage" menu.
7.5 Thumbnail View
In "Thumbs View" 12 thumbnail pictures of the selected album are shown at once. Use the joystick to navigate. A rectangle frame indicates the position. You can navigate through the complete album with the joystick and the softkeys.

Fig. 7.14: Screen "Photo Album - Thumbs View".
Softkey 1, "Prev":
Go back one page.
Softkey 2, "Next":
Advance one page.
Softkey 3, "GoTo":
Opens another screen where you can choose between "First", "Last" and a specific picture number which you can enter moving the joystick right / left or select a number by pressing the joystick.
Softkey 5, "More":
Leads to the screen where you can rotate a single photo. See 7.4.5 for further details.
7.6 File ListView
In the "File list View" mode 10 file names of the selected album are listed. The first picture name is highlighted and its thumbnail is shown in the left hand corner. Use the joystick up / down to navigate through the album file by file. Use the joystick left / right to navigate per page.
By using the softkeys you can navigate quickly through the complete album as follows:
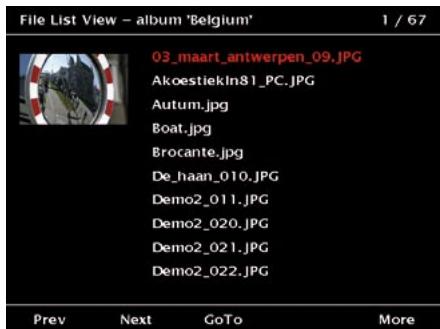
Fig. 7.15: Screen "Photo Album - File list view".
Softkey 1, "Prev":
Go back one page.
Softkey 2, "Next":
Advance one page.
Softkey 3, "GoTo":
Opens another screen where you can choose between "First", "Last" and a specific picture number which you can enter moving the joystick right / left or select a number by pressing the joystick.
Softkey 5, "More":
Leads to the screen where you can rotate a single photo. See 7.4.5 for further details.
7.7 View Slide Shows
With the GVPE complete slide shows can be prepared. They can be viewed either on the device, on a TV or flat screen or as beamer show on a larger screen.
Slide shows only work with JPEG files and RAW files that include embedded JPEG previews.
To start a slide show of your pictures do the following:
1 The slide shows are always connected to an album. Therefore copy all photos for the slide show in one album.
2 Select this album.
3 If the GVPE goes directly to Picture, Thumbs or File list viewing, press the "Back" button to get in the "Viewing options" screen. In the viewing options screen select "View Slide Show". The screen as depicted in fig 7.16 with options will pop up:
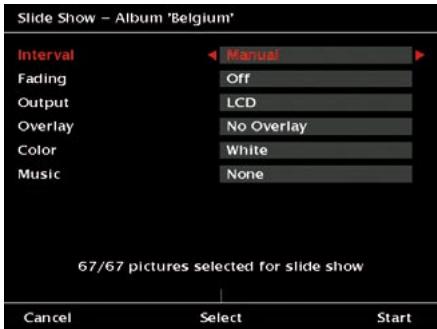
Fig. 7.16: Screen "Slide Show - Album xxx" to define the settings of the slide show.
The possible settings for the single options are:
- Interval: Select the timing of the slide show. The viewing time for each slide can be set between 5 and 45 seconds. Use the joystick right / left to change the setting. If "Manual" is selected, you can switch to the next or previous slide by using either the remote control or the joystick.
- Fade: Fading between pictures can be switched off here or can be set to any of 3 fading speeds. Use the joystick right / left to change the setting.
- Output: Select between LCD (view on
the GVPE), (view on a TV, flat screen or beamer) TV. Use the joystick right / left to change the setting.
- Overlay: File name, date, comments, author, description or shooting data can be overlaid during the slide show. By default this is switched off. Use the joystick right / left to change the setting.
- Color: Controls the color of the overlay text. Use the joystick right / left to change the setting.
- Music:The GVPE can play music during the slide show. This interface field allows you to select a music album. Use the joystick right / left to change the setting.
Select Photos from an album
If you want to show only a selection of the pictures in the active album, you have to define the pictures for your selection here. For each album the GVPE will remember the last selection. See chapter 4.2 for selection advice.
Start and the slide show
Press the softmax 5, "Start" to start the slide show. The slides will be shown in an endless loop.
Stop the slide show
To stop the slide show, press any of the softkeys or the "Back" button.
7.8 Print Photos
You can print JPEG pictures directly from your GVPE to any PictBridge compatible printer.
To print a photo, select an album from the "Photos" menu and press softkey 4, "Print". You then have to connect the printer to the GVPE via the long cable, plugged into the lower USB socket.

Fig. 7.17: Connection GVPE - PictBridge compatible printer.
Connect the GVPE to your PictBridge printer and wait a few seconds. The GVPE will try to detect the printer. When the connection is successful the printer will return its capabilities. This includes the type and size of paper, the number of pictures that can be printed on one page etc.
The printer will print all photos in the relevant album. If only a selection of photos shall be printed, press softmax 3, "Select", and select the photos to be printed. See chapter 4.2 for selection advice.
Adjust the settings to your needs and press "Start".

You cannot print RAW files in this way because the PictBridge standard does not support it. PictBridge is a protocol that expects the devices to send JPEG files to the printer. It is the printer that first decodes the JPEG file and then prints it. Problems may occur with photos manipulated with photo editing software. Some printers may print them while other printers will generate an error message. Please keep in mind that in all cases GVPE is just sending the files to the printer and has no control over the decoding.
7.9 Rename Photos
7.9.1 Rename Albums
Whenever you import an album from the CompactFlash card or via WiFi, the albums get a name consisting of a prefix and an number in ascending order. If you do not want to use the automatically generated names, it is helpful to rename an album.
To rename an album do the following:
1 Press "Home".
2 Press softmax 1, "Photos".
3 Use the joystick up / down until the album you want to rename is highlighted.
4 Press softmax 5, "Manage".
5 Use the joystick up / down until "Rename Album" is highlighted.
6 Press the joystick (enter) and you will see the keyboard.
7 Enter the new name for the album. See chapter 4.3 for instructions how to use the keyboard.
7.9.2 Rename Pictures
Digital cameras automatically assign file names to the pictures. This function allows you to rename a group of files and give them a similar name combined with a ascending number.
To rename the pictures in an album do the following:
1 Press "Home".
2 Press softmax 1, "Photos".
3 Use the joystick up / down until the album you want to rename is highlighted.
4 Press softkey 5, "Manage".
5 Use the joystick up / down until "Rename Pictures" is highlighted.
6 Press the joystick (enter) and you will see the screen as depicted in Fig. 7.18.
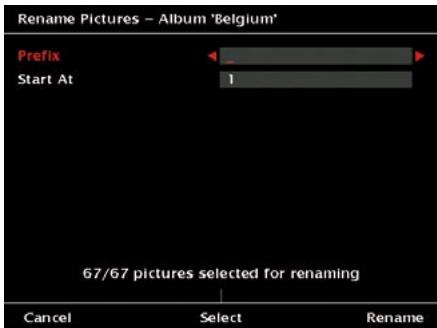
Fig. 7.18: Screen "Rename Pictures - Album xxx".
7 Use the joystick right / left and the keyboard will appear. Enter the new prefix for the new picture names. See chapter 4.3 for instructions how to use the keyboard.
8 By default the number of the renamed pictures will start with 00001. If you want to start with another number, use the joystick up / down to highlight the "Start at" line.
9 Use the joystick right / left and the keyboard will appear. Enter the starting number for the counter. See chapter 4.3 for instructions how to use the keyboard.
10 In case you want to rename only a part of the pictures in the album, select the pictures to be renamed by pressing softkey 3, "Select". See chapter 4.2 for instructions how to select pictures.
11 Press softmax 5, "Rename" to start the renaming procedure.
7.10 Sort and Select photos
7.10.1 Copy Pictures to another Album
To move or copy pictures in another album do the following:
1 Press "Home".
2 Press softmax 1, "Photos".
3 Use the joystick up / down until the album you want to rename is highlighted.
4 Press softkey 5, "Manage".
5 Use the joystick up / down until "Copy Pictures to CF Memory Card" is highlighted.
6 Press the joystick (enter) and you will see the screen shown in fig. 7.19.
7 Follow the instructions as described in chapter 6.1.2. but select the album you want to copy the files to.
8 Press softmax 5, "Start", to start the copy process.
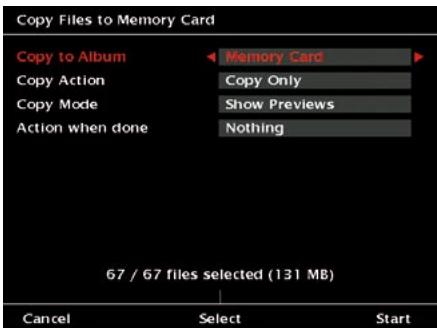
Fig. 7.19: Screen "Copy Files to memory Card".
7.10.2 Add Comments
The EXIF data is a set of information that describes the technical data of a digital photo. The GVPE allows you to add "User comments" and "Image description" data into the EXIF fields. Also an "Author" name and "Copyright notice" can be added.
Comments can only be added to JPEG files that
already have EXIF data embedded. This feature will not work with RAW files or JPEG files without EXIF information.
If you add comments or keywords to JPEG photos using GVPE's annotating functions the text strings will be placed in the following EXIF and IPTC fields:
GVPE Image Description
EXIF : Image : Image description
GVPE Comment
To add the comments, proceed as described below:
1 Press "Home".
2 Press softmax 1, "Photos".
3 Use the joystick up / down until the album you want to rename is highlighted.
4 Press softkey 5, "Manage".
5 Use the joystick up / down until "Add comments to Pictures" is highlighted.
6 Press the joystick (enter) and you will see the screen as depicted in fig. 7.20.
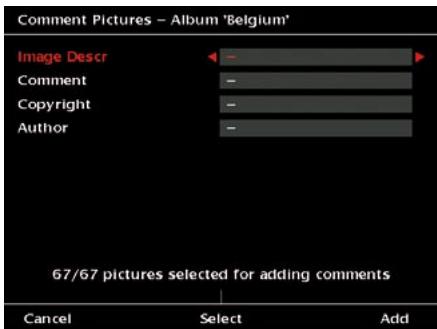
Fig. 7.20: Screen "Comment Pictures - Album xxx".
7 You can enter information into each of the four fields. Use the joystick right / left and the keyboard will appear. Enter the text. See chapter 4.3 for instructions how to use the keyboard.
8 In case you want to comment only a part of the pictures in the album, select the pictures by pressing softmax 3, "Select". See chapter 4.2 for instructions how to select pictures.
9 Press softkey 5, "Add" to start the procedure. If you handle an album with many pictures, this process might take some time.
7.10.3 Manage Keywords
A digital camera can provide you with a lot of pictures. Finding them back on your computer later on can be a challenge. The GVPE allows you to add different keywords to your files. These keywords will be embedded in the EXIF fields of your JPEG files. The format used is compatible with Adobe Photoshop, Adobe Photoshop Elements and Adobe Photoshop Album.
Keywords can not be added to RAW files.
You can add, edit and delete keywords with the computer or using the the GVPE.
Add keywords from the PC:
Keyword lists are stored in plain text files that have the extension ".txt". On the PC you can generate as many keyword files as you want. For example you could have files called: People.txt, Places.txt, Parties.txt, Colors.txt and so on.
Places.txt Rome
New-York
London
Brussels
Each file contains a simple list of words. They can be selected as keywords after the files have
been copied to the GVPE.
To copy the keyword lists to the PC, follow the steps below:
1 Connect the GVPE to the PC via the upper USB socket (see chapter 6.2 for detailed instructions).
2 Copy the files in the folder Device/ Keywords.
3 Disconnect the device. Afterwards the keyword lists will be available on the device.
To edit keywords on the GVPE, do the following:
1 Press "Home".
2 Press softmax 1, "Photos".
3 Use the joystick up / down until the album you want to rename is highlighted.
4 Press softkey 5, "Manage".
5 Use the joystick up / down until "Edit keywords" is highlighted.
6 Press the joystick (enter) and you will see the screen as depicted in fig. 7.21.
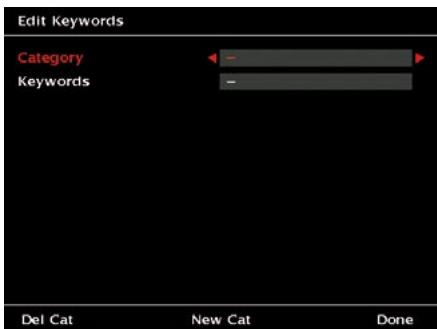
Fig. 7.21: Screen "Edit keywords".
Enter categories
7 If there are already categories available, you can choose a category by using the joystick right / left.
8 To enter a new category, press softkey 3, "New Cat" and the keyboard will appear. Enter the text. See chapter 4.3 for
instructions how to use the keyboard.
9 To delete a category, press softkey 1, "Del Cat" and the category will be deleted immediately.
Enter keywords
10 If there are already keywords available, you can choose a keyword by using the joystick right / left.
11 To enter a new keyword, press softmax 3, "New KW" and the keyboard will appear. Enter the text. See chapter 4.3 for instructions how to use the keyboard.
12 To delete a keyword, press softkey 1, "Del KW" and the keyword will be deleted immediately.
7.10.4 Add Keywords to Pictures
If you want to tag a large number of pictures with the same keywords, proceed as follows: To edit keywords on the GVPE, do the following:
1 Press "Home".
2 Press softmax 1, "Photos".
3 Use the joystick up / down until the album you want to rename is highlighted.
4 Press softkey 5, "Manage".
5 Use the joystick up / down until "Add keywords to Pictures" is highlighted.
6 Press the joystick (enter) and you will see the screen as depicted in fig. 7.22.
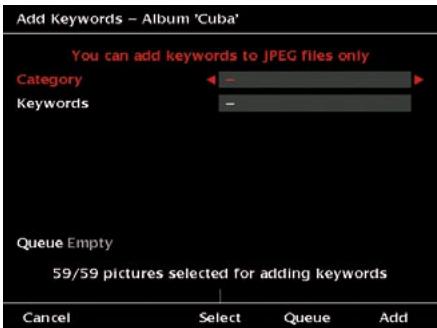
Fig. 7.22: Screen "Add keywords - Album xxx".
7 Press Softkey 3, "Select" and select the pictures that shall get the same combination of keywords.
8 Choose a category by using the joystick right / left.
9 Choose a keyword by using the joystick right / left.
10 You can select more than one keyword. In this case, press softmax 4, "Queue". This adds the currently displayed keyword to the keywords selected before.
11 Press softmax 5, "Add" to actually write all the queued keywords to your pictures.
You can add keywords to JPEG files only.
7.11 View Pictures with Photo Voice Annotations
Many cameras allow to store a short voice annotation together with the photos. These voice annotations are stored as WAV files and have the same file name as the photo.
When copying content from memory cards or a camera, the pictures will be stored in a separate Photo Album. Files with a .WAV extension and the same file name as any of the photos will also be stored in the Photo album. In this way voice annotation files stay grouped with the original pictures and xyz.JPG and xyz.WAV remain in the same directory.
When viewing pictures in Full Picture, Thumbs or List View there will be an additional WAVoption displayed when the current picture has an annotation file associated with it. To play the voice annotation, press softkey 5, "More" in the picture viewing mode. Then an option called "Wav" will appear on softkey 3. Press it to actually play the sound file.
8 Dust Detection
While changing lenses on Digital Single Lens Reflex (DSLR) cameras, dust can enter the camera and stick to the sensor. This means that cameras need to be cleaned sometimes in the field. The GVPE offers a unique dust detection feature that helps you trace the small dust spots. Choose a JPEG file for the dust check, because this feature needs the JPEG format.
1 Make a picture of an even surface (blue sky, white wall etc.) using a high aperture value.
2 Transfer the picture to GVPE. This creates a new album (see chapter 6 for advice).
3 Press "Home".
4 Press softkey 1, "Photos".
5 Use the joystick to select the album with the test picture.
6 Press softmax 3, "View".
7 Use the joystick to select "View Dust".
8 Select the picture of the even surface and press softmax 5, "Check".
The device will indicate the position of dust particles on the screen and it gives you feedback about the success of a cleaning attempt.
Use softkeys 1 and 2, "Sense -" and "Sense +", for adjusting the sensitivity.
Softkey 3, "Reset":
Returns to the original sensitivity.
Softkey 4, "Hide"
Hides the picture itself and leaves the detected dust particles only.
Softkey 5, "Done":
Returns to the selection menu.
9 Playing Music
9.1 Playing Music
The GVPE is able to identify and play MP3 files. To listen to music, do the following:
1 Go to the "Home" menu.
2 Select "Music" by pressing softkey 2. A list of albums will appear.
3 Use the joystick up / down to select an album.
4 Press the joystick to confirm your selection.
5 The screen will display a list of all tracks in that album as shown in fig. 9.1. Use the joystick up / down to select a track.
6 Press the joystick to start playing that track.
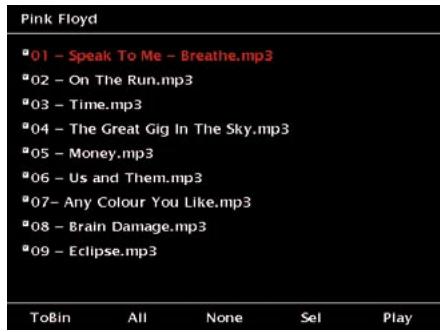
Fig. 9.1: Screen "Select a music track".
In this menu you can define a personal play list. To organize the play list, you have the following options:
Press softmax 2, "All",
to select all songs from the list.
Press softkey 3, "None",
to deselect all songs form the list.
Press softmax 4, "Sel"
to select or omit the song actually highlighted from the play list.
When done, press softmax 5, "Play", to start playing. A screen as shown in fig. 9.2 will appear.
If you want to listen to a certain song, select the song and press the joystick to start playing it.
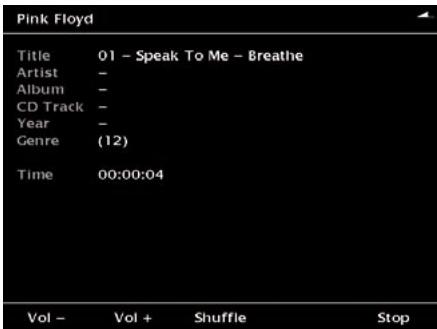
Fig. 9.2: Screen "Play song"
While a song is playing, you can
- press softmax 1, "Vol -"
to reduce the volume resp.
softkey 2, "Vol. +"
to increase the volume.
- press softmax 5, "Stop" or the joystick
to stop the MP3 playback.
The GVPE will play the songs in the order they appeared on the list as shown in fig. 9.1. As an alternative, you can select softkey 3, "Shuffle" and the songs will be played hephazardly.
Use the joystick up /down to select the previous or next song.
Use the joystick left / right to skip back and forth in the song.
9.2 Copy Sound Files
To copy sound files back from the GVPE to a CompactFlash card or from one album to another, proceed as described here:
1 Go to the "Home" menu.
2 Select "Music" by pressing softkey 2. A list of albums will appear.
3 Use the joystick up / down to select an album.
4 Press softmax 5, "Manage".
5 Select "Copy music to CF Memory Card" and press the joystick.
6 A screen as shown in fig. 9.3 will appear.
7 Follow the instructions in chapter 6.1.2 to copy the files to your CompactFlash card or to another album.
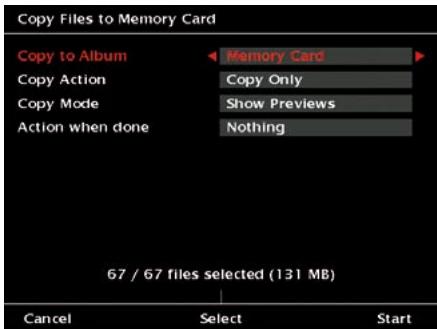
Fig. 9.3: Screen "Copy Files to Memory Card"
On how to convert Music CDs to the corresponding formats, please ask your local dealer or have a look at specific web pages for details.
9.3 Delete an Album or a Single Music File
If you want to delete an album from your GVPE, proceed as described here:
1 Go to the "Home" menu.
2 Select "Music" by pressing softmax 2. A list of albums will appear.
3 Use the joystick up / down until the album you want to delete is highlighted.
4 Press softkey 5, "Manage".
5 Use the joystick up / down to select "Send an Album to Bin" and press the joystick.
6 A confirmation screen will appear.
7 Press softmax 1, "Cancel", to abort the process.
8 Press softmax 5, "Delete", to delete the album. In this case the album will be moved into the "Recycle Bin".
To delete a single music file, follow the steps below:
1 Go to the "Home" menu.
2 Select "Music" by pressing softmax key 2. A list of albums will appear.
3 Use the joystick up / down to select the album.
4 Press softmax 3, "Songs".
5 Use the joystick up / down to highlight the song that shall be deleted.
6 Press softmax 1, "ToBin". Now the song will be moved into the "Recycle Bin" immediately.
9.4 Rename an Album
Whenever you import an album from the CompactFlash card or via WiFi, the albums get a name consisting of a prefix and an number in ascending order. If you do not want to use the automatically generated names, it is helpful to rename an album.
To rename an album do the following:
1 Press "Home".
2 Press softmax 2, "Music".
3 Use the joystick up / down until the album you want to rename is highlighted.
4 Press softmax 5, "Manage".
5 Use the joystick up / down until "Rename Album" is highlighted.
6 Press the joystick (enter) and you will see the keyboard.
7 Enter the new name for the album. See chapter 4.3 for instructions how to use the keyboard.
10 Watching Movies
10.1 Watching Movies
The GVPE is able to identify and play MPEG2 or MPEG4 files. To play a movie, do the following:
1 Go to the "Home" menu.
2 Select "Movies" by pressing softkey 3. A list of albums will appear.
3 Use the joystick up / down to select an album. (See fig. 10.1)
4 Press the joystick to confirm your selection.
5 The screen will display a list of all tracks in that album as shown in fig. 10.1. Use the joystick up / down to select a track.
6 Press the joystick to start playing that track.
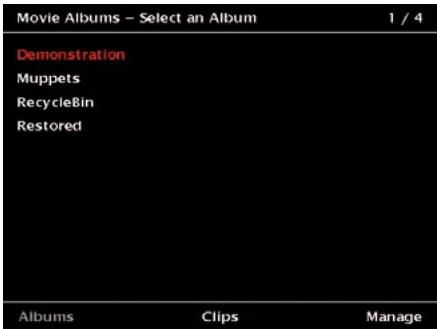
Fig. 10.1: Screen "Select a movie album".
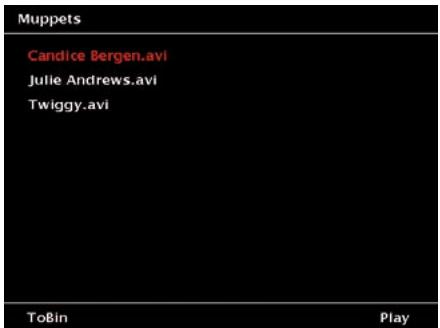
Fig. 10.2: Screen "Select a movie clip".
Press softmax 1, "ToBin", to delete the clip highlighted.
Press softkey 5, "Play",
to start playing. A screen as shown in fig. 10.3 will appear.
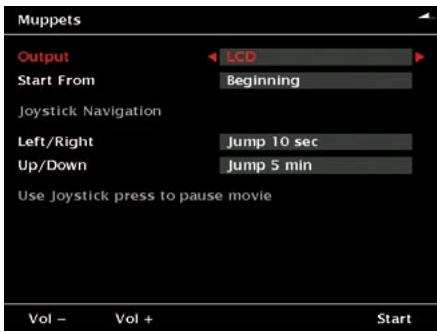
Fig. 10.3: Screen "Play movie clip".
Before starting the movie please check these settings.
1. Output:
Select between LCD, TV and DVI.
In this case be aware that the digital video output has a fixed resolution of 640 × 480 pixels (VGA, 60Hz ), i.e. the connected monitor or flat screen has to support this setting. PC
monitors that only provide higher resolutions will not be able to synchronize with the GVPE. In this case the settings of the PC's video card have to be adjusted. Please consult the PC manual for further information.
Use the joystick right / left to select your choice.
2. Start from:
Either select to start from the beginning of the movie or to resume playing from the position where it was stopped last time. Use the joystick right / left to select your choice.
3.Left/Right:
Select the amount of time that will be skipped by moving the joystick left (back) or right (forward). Use the joystick right / left to select your choice.
4. Up / Down:
Select the amount of time that will be skipped by moving the joystick up (back) or down(forward). Use the joystick right / left to select your choice.
Press softmax 5, "Start"
to view the movie clip.
While playing a movie you can press the joystick to pause. Press the joystick again to continue playing.
Press softmax 1, "Vol -" to reduce the volume resp. softmax 2, "Vol. +" to increase the volume.
Press softkey 5, "Stop" or the joystick to stop the movie.
Use the joystick up-down to jump back and forth in the movie.
Use the joystick left-right for Fast Reverse or Fast Forward.
The volume controls and softmax 5, "Stop" remain active even if your GVPE is using the full LCD screen to display the movie.
10.2 Copy Movie Clips
To copy movie files back from the GVPE to
a CompactFlash card or from one album to another, proceed as described here:
1 Go to the "Home" menu.
2 Select "Movies" by pressing softmax 3. A list of albums will appear.
3 Use the joystick up / down to select an album.
4 Press softmax 5, "Manage".
5 Select "Copy Movies to CF Memory Card" and press the joystick.
6 A screen as shown in fig. 10.3 will appear.
7 Follow the instructions in chapter 6.1.2 to copy the files to your CompactFlash card or to another album.
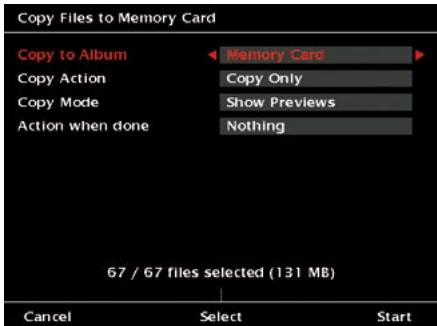
Fig. 10.3: Screen "Copy Files to Memory Card"
On how to convert DVDs to the corresponding formats, please ask your local dealer or have a look at specific web pages for details.
10.3 Delete an Album or a Single Movie Clip
If you want to delete an album from your GVPE, proceed as described here:
1 Go to the "Home" menu.
2 Select "Movies" by pressing softmax 3. A list of albums will appear.
3 Use the joystick up / down until the album you want to delete is highlighted.
4 Press softmax 5, "Manage".
5 Use the joystick up / down to select "Send
Album to Bin" and press the joystick.
6 A confirmation screen will appear.
7 Press softmax 1, "Cancel", to abort the process.
8 Press softmax 5, "Delete", to delete the album. In this case the album will be moved into the "Recycle Bin".
To delete a single movie clip, follow the steps below:
1 Go to the "Home" menu.
2 Select "Movies" by pressing softmax 3. A list of albums will appear.
3 Use the joystick up / down to select the album.
4 Press softmax 3, "Clips".
5 Use the joystick up / down to highlight the song that shall be deleted.
6 Press softmax 1, "ToBin". Now the movie clip will be moved into the "Recycle Bin" immediately.
10.4 Rename an Album
Whenever you import an album from the CompactFlash card or via WiFi, the albums get a name consisting of a prefix and an number in ascending order. If you do not want to use the automatically generated names, it is helpful to rename an album.
To rename an album do the following:
1 Press "Home".
2 Press softmax 3, "Movies".
3 Use the joystick up / down until the album you want to rename is highlighted.
4 Press softmax 5, "Manage".
5 Use the joystick up / down until "Rename Album" is highlighted.
6 Press the joystick and you will see the keyboard.
7 Enter the new name for the album. See chapter 4.3 for instructions how to use the keyboard.
11 Software Upgrade
On a regular basis updates of the GVPE software will become available. These updates can include new functionalities, support for more camera formats and bug fixes.
To upgrade your GVPE do the following:
1 Visit the JOBO website www.jobo.com and go to the "Download" section.
2 Download the latest version of the software on your computer.
3 Unzip the downloaded file.
4 Connect the USB cable to your PC.
5 Connect the GVPE with the PC (see chapter 6.2, "Copying Data from or to a Computer").
6 Copy the downloaded files to the root directory of GVPE (do not copy the files into one of the existing directories!)
7 Switch off the GVPE.
8 Wait some seconds, then switch on the GVPE again.
9 A message will appear indicating that the GVPE is upgrading its software.
10 If for some reason the process is interrupted, try again later.
12 Available Accessories
Optionally available are:
External PowerPack, Art. No. GVEB01
This PowerPack loads the internal battery of the GIGA Vu PRO twice.
Capacity: 3 Ah
Voltage: 9V
Discharge Current: Max. 1.5 A
Charge Voltage: 9 V
Charge Current: 1.5 A
Size: 58.5 × 41 × 82 mm
Weight: 300g
- Gauge: Five stage charge level indicator (low battery alarm)
Battery Protection: Over-charge / Over-discharge / Express current / Short circuit
- Discharge Temperature: -20^ + 60^ (Recommended: -10^ + 50^ )
Charge Temperature: 0^ + 40^
Storage: Full charged one time approx. 45 days at -10^ + 40^ (Recommended: -5^ + 35^ )
Cycle Life: >500 Cycles @ 20^
Car adapter (power supply for 12 V socket, e.g. in a car's cigarette lighter), Art. No. GVEZ01
This adapter saves the battery and can be used for recharging the device while driving.
WLAN adapter card, Art. No. GVZ002 (WIFI CompactFlash Card)
This card enables a wireless data transfer from and to the GVPE.
IEEE802.11b CF Type I WLAN Card
Major Chipset: Intersil Prsim2,5
Frequency Band: 2.4000 2.4835 GHz (subject to local regulation)
Data Rate 11 MB
Power Consumption: 180mA max. 200mA (70 mA in power saving mode)
- Operating Range: Up to 250 m in open area; 60 m indoor
- Ambient temperature: 0^ + 55^ (Operating); -20^ + 65^ (Storage)
Humidity: Max. 95% non-condensing
Supported OS: Windows 98SE / ME / 2000 / XP, WinCE 2.1x, WinCE 3.0, PockPC, PockPC2002, Linux.
Multi Card Adapter, Art. No. GVZ001
Adapter to enable reading data from memory cards other than CompactFlash.
Can be fed with
Memory Stick,
Memory Stick PRO,
SmartMedia,
- SecureDigital and
Multimedia cards.
13 Technical Specification
General
Model name
JOBO GigaVu Pro Evolution (GVPE)
Storage
40, 80 or 120 GBytes of hard disk storage. No system files on the device.
Screen
3.7 inch high quality color LCD screen.
640*480 RGB pixels.
Adjustable brightness.
Battery
Replaceable high quality rechargeable Li-Ion battery (2200 mAh).
Dimensions
145 × 107 × 38 mm
Weight
420g
Menu languages
English, French, German, Italian, Spanish,
Swedish, Dutch.
Upgrades
Firmware fully user upgradeable.
Device Info
Number of albums, number of photos, hard disk space used/free, battery status, software version number.
Device Settings
Menu language, LCD brightness, decode quality, album naming convention.
Owner Info
Name, E-mail, phone, copyright notice.
Interfaces
Memory cards
Supports CompactFlash (CF) cards, Type I/II and Microdrives.
Other media (SmartMedia, Memory Stick, SD, MMC, xD) supported through optional adapter, (sold an optional accessory).
Interfaces
upper: USB 2.0 high speed interface. The GVPE is recognized as a computer's external HDD, for fast up- and downloading from or to PC.
lower: USB 2 high speed OTG interface for connection to cameras and PictBridge enabled printers.
WiFi enabled (the WiFi (IEEE802.11b)
CompactFlash card is sold as an option).
Analogue video out
PAL/NTSCselectable.
Analogue audio out
Headphone / audio line out compatible.
Built in loudspeaker with volume control.
Digital video out
High quality digital video out for connecting to LCD or plasma TVs and PC monitors, Resolution 640x480 (VGA 60hz)
WiFi connection
SSID, Channel, Mode, WEP, Key, Authentication type.
Copy functions
Automatic activation of copy function after memory card insertion.
Selective / full copy from CF to harddisk.
A new album (directory) is generated for each download.
Selective / full copy from harddisk to CF.
Copy with or without preview.
Verify after copy function.
Switch off after copy and verify function.
Photo
Supported file formats
JPEG: All functions
Typical decoding times for 6 Megapixel file: Full screen view on LCD: < 1 s
Full zoom: approx. 3 s
RAW: All functions except "Slide Shows" and "Dust Detection"
For overview of supported cameras consult www.jobo.com
TIFF: Restricted to embedded thumbnail viewing in Full Picture View
Display modes
Thamburger view: Shows 12 thumbs per page Full picture view: Shows one photo full screen on the LCD display (JPEG).
For RAW files this mode will show the large embedded JPEG thumbnail if available.
File list view: Shows one thumb at the time and a list of 10 file names.
Slide show view: Shows photos full screen on LCD or TV output.
Selection of photos to be included in the slide show, adjustable slide interval (JPEG only).
Picture Info view
Shows one thumb at the time plus EXIF shooting data.
Channels view
Shows one photo full screen on the LCD with RGB, red channel only, green channel only, blue channel only or B&W.
B&W conversion selectable between Luminance channel and RGB channel mixer.
Levels view
Shows one thumbnail at the time and the red, green, blue or RGB histogram.
Zoom functions
Zoom max: In "Full Zoom" mode one pixel on the LCD screen corresponds with one pixel in the photo file.
On screen zoomed section position indicator. Zoom function works for JPEG and all supported RAW formats.
Navigation functions
Show next or previous picture (available in all display modes except slide show).
Show next or previous page of thumbs (available in thumbnail mode only).
Jump to a specific picture.
Edit functions
Rotate clockwise (JPEG only).
Rotate counter-clockwise (JPEG only).
Send picture to Recycle Bin.
Recover picture from Recycle Bin.
Album functions
Rename album.
Batch rename pictures.
Add comments to pictures.
Add keywords to pictures (JPEG files only).
Send album to Recycle Bin.
Music
Supported file formats
MP3 files
Device functions
Play, Stop, Fast Forward, Rewind
Movies
Supported file formats
On built-in LCD screen:
MPEG2
640*480pixels
up to 10 Mbps
30 frames per second
+audio128kbps
MPEG4
640*480pixels
up to 4 Mbps
30 frames per second
+audio128kbps
Device functions
Play, Stop, Fast Forward, Rewind
Part of this product is based on the work of the independent JPEG group.
Part of this product is based on open source software. The source code version of the open source software covered by the GPL, LGPL or MPL license is available on request.
The GIGA Vu PRO evolution was designed and developed in Belgium and manufactured in The Philippines.
Technical changes reserved.
Addendum1
A new software upgrade of the GigaVU Pro Evolution allows you to add metadata and keywords in a more convenient way. With a new function you can enter metadata in a template that is stored inside the unit's flash memory. Goto Photo>Manage>Edit Metadata template. You can enter metadata in the following fields:
EXIF metadata
EXIF : Image description
EXIF : Artist
EXIF:Copyright
EXIF :User Comment
IPTC metadata
IPTC1: Headline
IPTC1 : Description
IPTC1 : Keywords
IPTC1 : Description Writer
IPTC2 : Location Name
IPTC2 : City
IPTC2 : State/Province
IPTC2 : Country
IPTC2 : Edit State
IPTC3:Photographer (IPTC Artist
field)
IPTC3 : Photographer title
IPTC3:Job Identifier (IPTC
Transmission Reference field)
IPTC3 : Instructions
IPTC3 : Provider
IPTC3 : Source
IPTC3 : Copyright notice
Metadata can be added to photos in two ways.
-
When copying from memory cards to hard disk an option can be selected to automatically add the metadata template to all imported pictures.
-
For existing albums go to Photo > Manage > Add Metadata to Pictures. In this case you can select photos first and then launch a batch process to add the metadata
template to the selected pictures. Metadata is embedded in JPEG files only. For RAW files XMP sidecar files are generated. The meta data is added according to the IPTC standard.
GigaVu also allows you to add a 'Star rating' to pictures. You can give each picture a one, two or three star rating while viewing them. Goto Photos and select an album. As view mode select 'View Pictures' to view pictures full screen. The soft keys are now labeled Zoom - Info - Chann - Levels - More. Press the More button twice. The soft keys now read 1 star - 2 stars - 3 stars - clear - more. Use soft key 1 to 3 to add a star rating . Use softkey 4 to remove any star rating.
Star ratings can be stored in the IPTC: Urgency field, in an IPTC:Keyword or in both. Use the 'Settings' button to tailor this to your needs.
Where to look for the metadata you added? The metadata added by GigaVu will be accessible by most photo viewer/ browsers. However sometimes the info is somewhat buried in the user interface.
Here are some examples for frequently used programs.
1. Photoshop
The IPTC organization provides custom XML file info templates that can be added to Photoshop. You can use these for maximum compatibility. You can download them for free here: http:// www.iptc.org/IPTC4XMP/
Please also read the accompanying documentation: http://www.iptc.org/std/Iptc4xmpCore/1.0/ documentation/Ipct4xmpCore_1.0-docANcs1panelShareFix_1.pdf
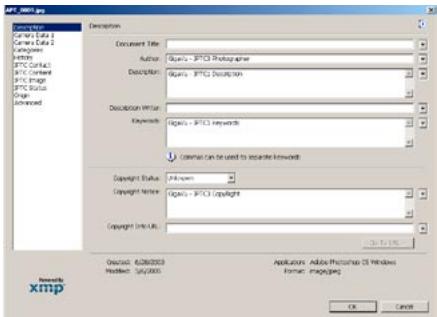

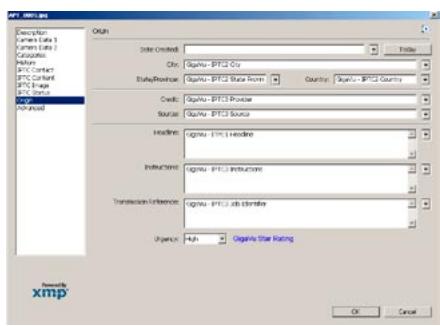
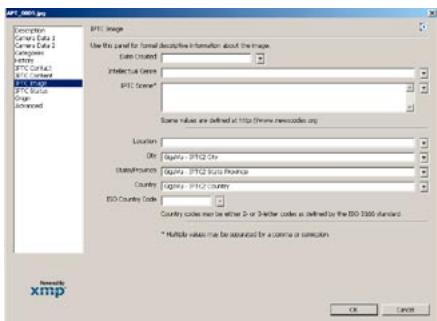
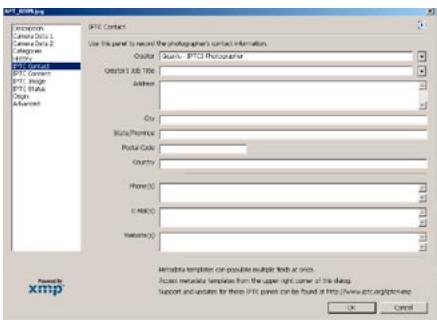

2. iView
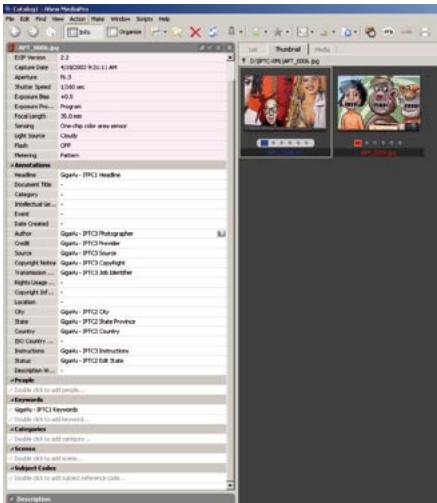
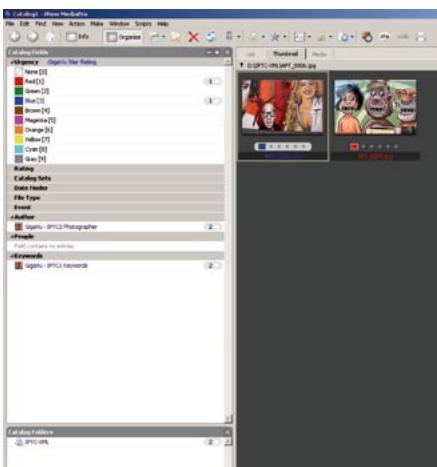
3. Photo Mechanic
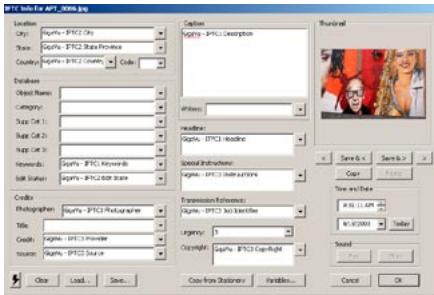
4. ACDSee
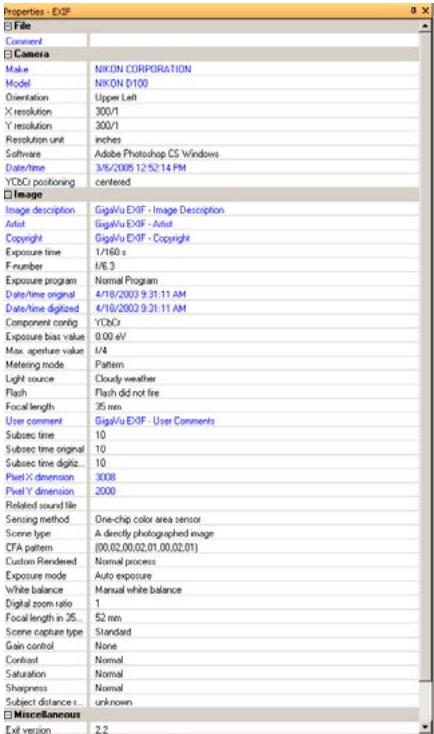
5. Exifer ( http://www.friedemann-schmidt.com/software/exifer/)